AWS IAM Roles for Kubernetes Service Accounts
Current Scenario
Imagine a scenario in which you are running an application on your kubernetes cluster as a deployment which simply fetches the user profiles from your S3 bucket and creates a presigned url for the user to be able to access their profile image. Normally to provide the access to the S3 bucket, what you would do is create a user in AWS, policy and attach that policy to the user. Then you would use the AWS access and secret keys of that user to load into your environment variables using kubernetes secrets.
Our core application
Imagine we have a flask application running and there is a function called create_presigned_url which generates a presigned URL for the objects that are present on our S3 bucket using the AWS_ACCESS_KEY_ID and AWS_SECRET_ACCESS_KEY that are provided as environment variables.
from flask import Flask
import logging
import boto3
from botocore.exceptions import ClientError

app = Flask(__name__)

#......................[snip].....................

def create_presigned_url(bucket_name, object_name, expiration=3600):


    # Generate a presigned URL for the S3 object
    s3_client = boto3.client(
			    's3',
                aws_access_key_id=os.getenv("AWS_ACCESS_KEY_ID"),
                aws_secret_access_key=os.getenv("AWS_SECRET_ACCESS_KEY")
                )
    try:
        response = s3_client.generate_presigned_url('get_object',
                                                    Params={'Bucket': bucket_name,
                                                            'Key': object_name},
                                                    ExpiresIn=expiration)
    except ClientError as e:
        logging.error(e)
        return None

    # The response contains the presigned URL
    return response

#......................[snip].....................

app.run(host='0.0.0.0', port=8000)
Reference: https://boto3.amazonaws.com/v1/documentation/api/latest/guide/s3-presigned-urls.html
Dockerfile used to create the image
There is nothing fancy here. This is the Dockerfile that is used to build the docker image which runs the flask application.
From python:3.7-alpine


RUN apk update && apk upgrade

COPY . /app
WORKDIR /app

ENV FLASK_APP=app.py

RUN pip3 install -r requirements.txt

RUN chown -R nobody:nobody /app
RUN chmod 700 -R /app
USER nobody

CMD ["python3","app.py"]
Kubernetes Manifest files
---
apiVersion: v1
kind: ServiceAccount
metadata:
  name: test
---
apiVersion: v1
data:
  AWS_ACCESS_KEY_ID: c29fc3dlZXRfdGhhdF95b3Vfd291bGRfZGVjb2RlX3RoaXM=
  AWS_SECRET_ACCESS_KEY: SV9zdXJlbHlfd291bGRfbm90X2xlYWtfYXdzX3NlY3JldF9vbl9hX2FydGljbGU=
kind: Secret
metadata:
  name: aws-secrets
type: Opaque
---
apiVersion: apps/v1
kind: Deployment
metadata:
  name: test
  labels:
    app: test
spec:
  selector:
    matchLabels:
      app: test
  template:
    metadata:
      labels:
        app: test
    spec:
      serviceAccountName: test
      containers:
      - env:
        envFrom:
        - secretRef:
            name: aws-secrets
        image: shishirsub10/test
        name: test
Here, I have created a Kubernetes secret, a service account and a deployment where the secrets called aws-secrets are injected inside the pod test.
Let us apply the above manifest file.
╭─ubuntu@kubernetes ~
╰─$ kubectl apply -f deploy.yaml
serviceaccount/test created
secret/aws-secrets created
deployment.apps/test created
Checking the secrets mounted inside the pod
╭─ubuntu@kubernetes ~
╰─$ kubectl get pods
NAME                    READY   STATUS    RESTARTS   AGE
test-7d88b97d78-tsfdw   1/1     Running   0          22s

╭─ubuntu@kubernetes ~
╰─$ kubectl exec test-7d88b97d78-tsfdw -- env | grep -i 'AWS'
AWS_ACCESS_KEY_ID=so_sweet_that_you_would_decode_this
AWS_SECRET_ACCESS_KEY=I_surely_would_not_leak_aws_secret_on_a_article
We can see the secrets mounted inside the container as environment variables. Now, this credential will be used by our flask application to create the presigned URL for S3 objects.
With this setup, we will always have the problem of rotating the AWS secrets. These credentials might end up in the configmap, Kubernetes secrets, CI/CD pipelines as well as source code where it might be visible to everyone working inside the comapny. Meanwhile many employees having an access to the AWS secrets might leave and these credentials are not rotated as often as we like, giving the ex employees access to the S3 bucket.
Real world examples where ex employees have done malicious activites on AWS infrastructure
- https://www.zdnet.com/article/former-cisco-engineer-sentenced-to-prison-for-deleting-16k-webex-accounts/
- https://www.securitynewspaper.com/2019/03/25/it-employee-was-fired-and-deletes-all-his-former-employers-aws-cloud-servers/
OIDC Implementation
To tackle these issues, let us use OIDC authentication such that a role is created on the AWS which is then attached to the Kubernetes service account associated with a deployment giving the pod access to the resources that it needs.
What is OIDC?
OpenID Connect (OIDC) is an identity layer built on top of the OAuth 2.0 framework. It allows third-party applications to verify the identity of the end-user and to obtain basic user profile information. OIDC uses JSON web tokens (JWTs), which you can obtain using flows conforming to the OAuth 2.0 specifications.
Reference: https://auth0.com/docs/authenticate/protocols/openid-connect-protocol
Changing the code
Let us start from the source code. It was explicitly mentioned to use the AWS Access and Secret keys in the boto3 client which needs to be removed. By default, boto3 looks for different methods in which AWS resources can be accessed and web identity token is one of them.`
import logging
import boto3
from botocore.exceptions import ClientError

def create_presigned_url(bucket_name, object_name, expiration=3600):


    # Generate a presigned URL for the S3 object
    s3_client = boto3.client(
			    's3'
                )
    try:
        response = s3_client.generate_presigned_url('get_object',
                                                    Params={'Bucket': bucket_name,
                                                            'Key': object_name},
                                                    ExpiresIn=expiration)
    except ClientError as e:
        logging.error(e)
        return None

    # The response contains the presigned URL
    return response
Right now, the application will work as expected as it still uses the AWS access and secret keys that are present as enviroment variables.
Boto3 will look in several locations when searching for credentials. The mechanism in which Boto3 looks for credentials is to search through a list of possible locations and stop as soon as it finds credentials. The order in which Boto3 searches for credentials is:
- Passing credentials as parameters in the
boto.client()method- Passing credentials as parameters when creating a
Sessionobject- Environment variables
- Shared credential file (
~/.aws/credentials)- AWS config file (
~/.aws/config)- Assume Role provider
- Boto2 config file (
/etc/boto.cfgand~/.boto)- Instance metadata service on an Amazon EC2 instance that has an IAM role configured.
Reference: https://boto3.amazonaws.com/v1/documentation/api/latest/guide/credentials.html
Let us create a role and policy on AWS first before removing the kubernetes secrets containing AWS credentials.
Creating role on AWS
- Login into AWS console and go to Identity and Access Management(IAM).
- We have to create a new role for the kubernetes service account.
IAM » Roles » Create Role

- Select Web Identity as Trusted entity type in which you have to select the Identity Provider for the right EKS cluster as well as set the audience. You have to create a Identity provider if you have not already done it and set the Audience to sts.amazonaws.com.
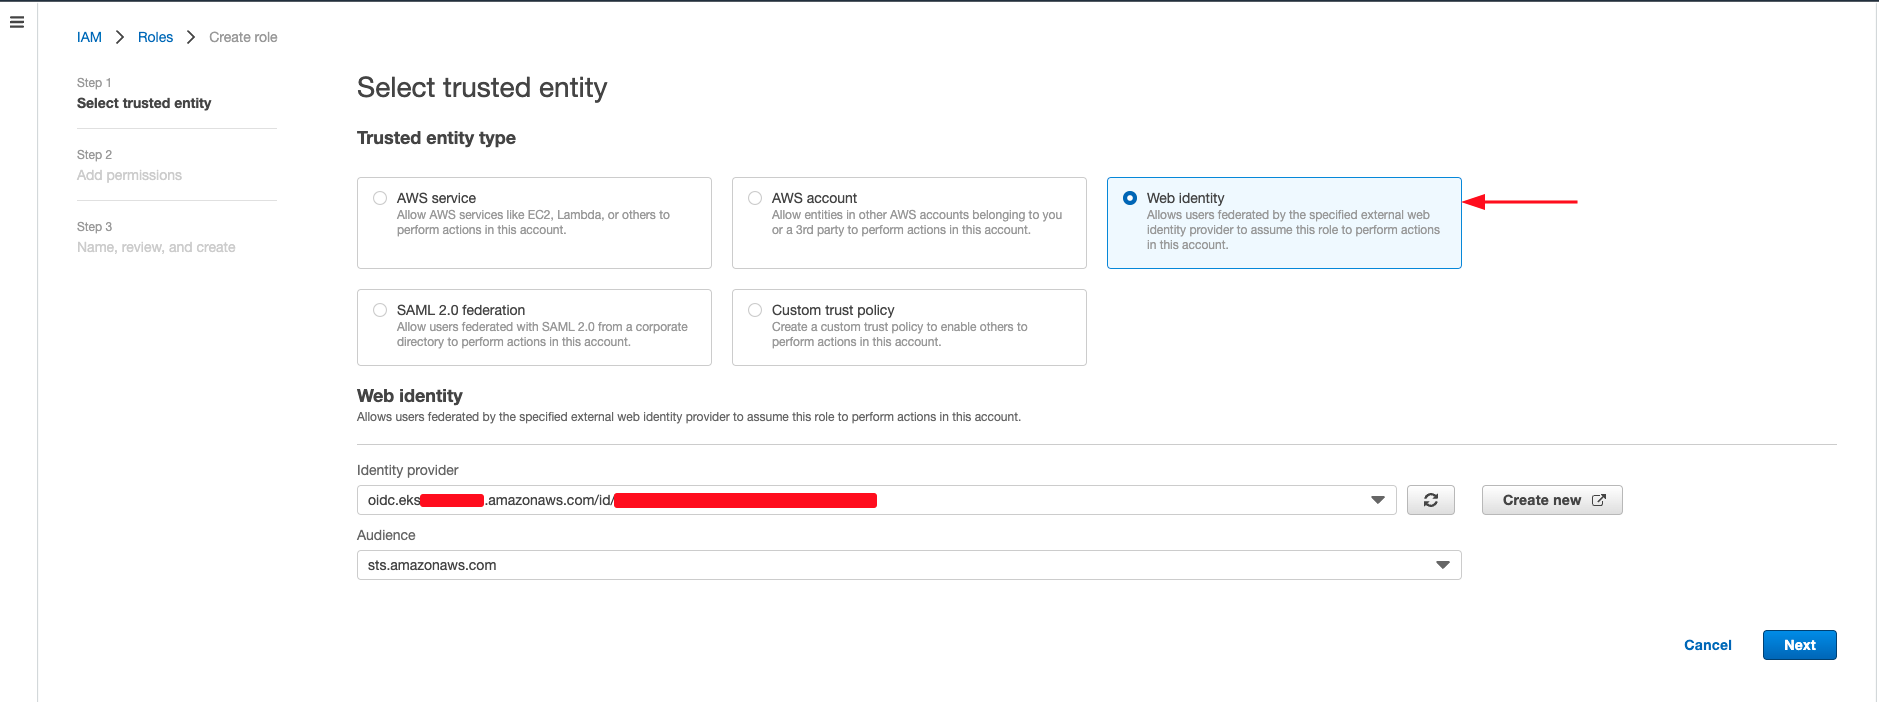
- Click on Next.
Skip the adding the new provider section if you have already created an Identity provider on AWS.
Adding a new provider
If you do not have an identity provider, you can create new identity provider from IAM » Identity Providers » Add Provider.

a. Click on Add provider.
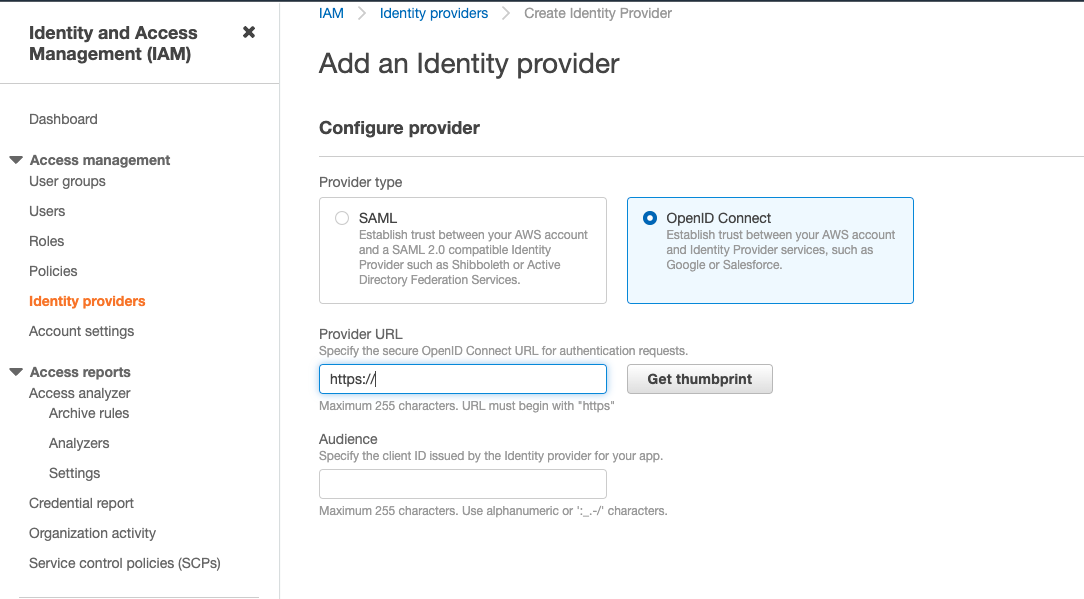
b. We want to use OpenID connect as the provider type. We can get the provider URL from our EKS cluster info page. c. Get the value of the OpenID connect provider URL from EKS » Clusters » Select relevant Clusters » Overview » OpenID Connect Provider URL
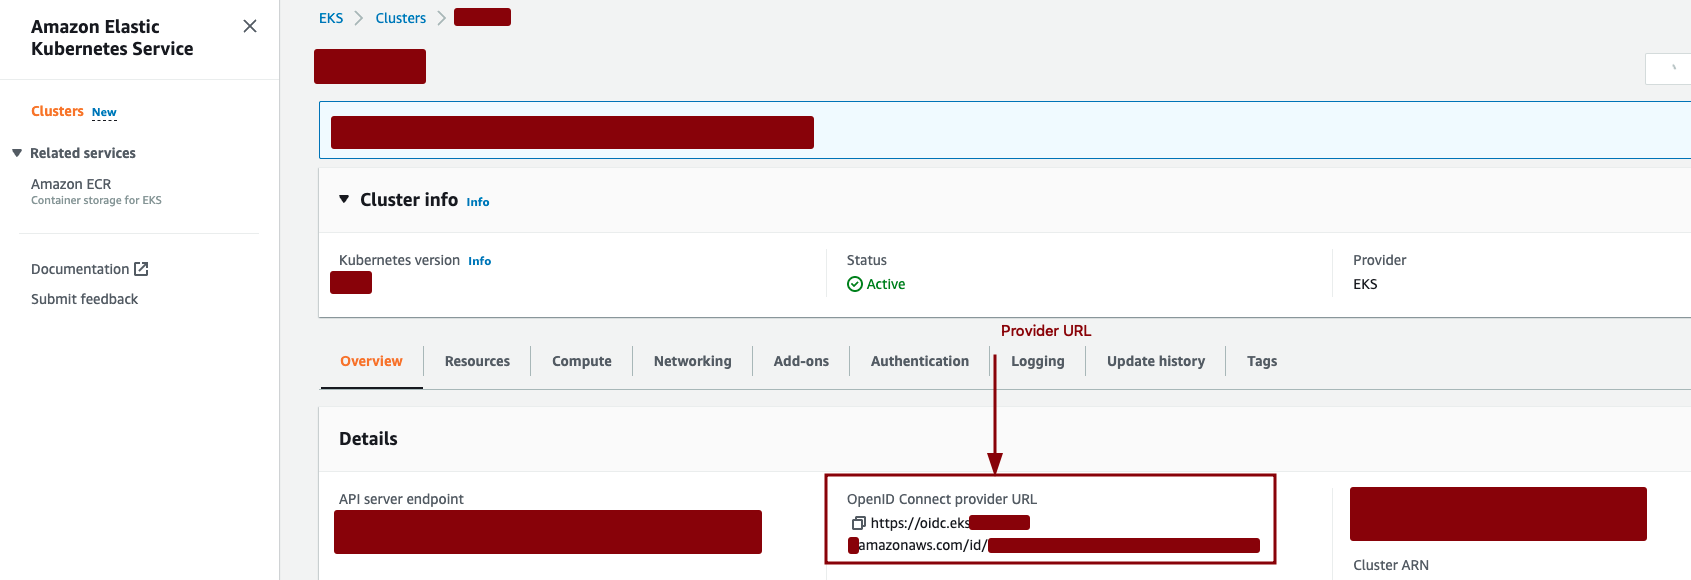
d. Paste the URL and click on Get thumbprint. e. Set the value of the audience as sts.amazonaws.com.
Reference: https://docs.aws.amazon.com/eks/latest/userguide/enable-iam-roles-for-service-accounts.html
Creating a new policy

After selecting the trusted entity, we now have to either create a new policy with fine grained permission or attach the existing policy for this role.
Example policy
{
    "Version": "2012-10-17",
    "Statement": [
        {
            "Sid": "VisualEditor1",
            "Effect": "Allow",
            "Action": [
                "s3:List*",
                "s3:Describe*"
            ],
            "Resource": [
                "arn:aws:s3:::test-bucket-for-profile-pictures/*",
                "arn:aws:s3:::test-bucket-for-profile-pictures"
            ]
        }
    ]
}
- Either create a new policy or select the exisiting policy and click Next.
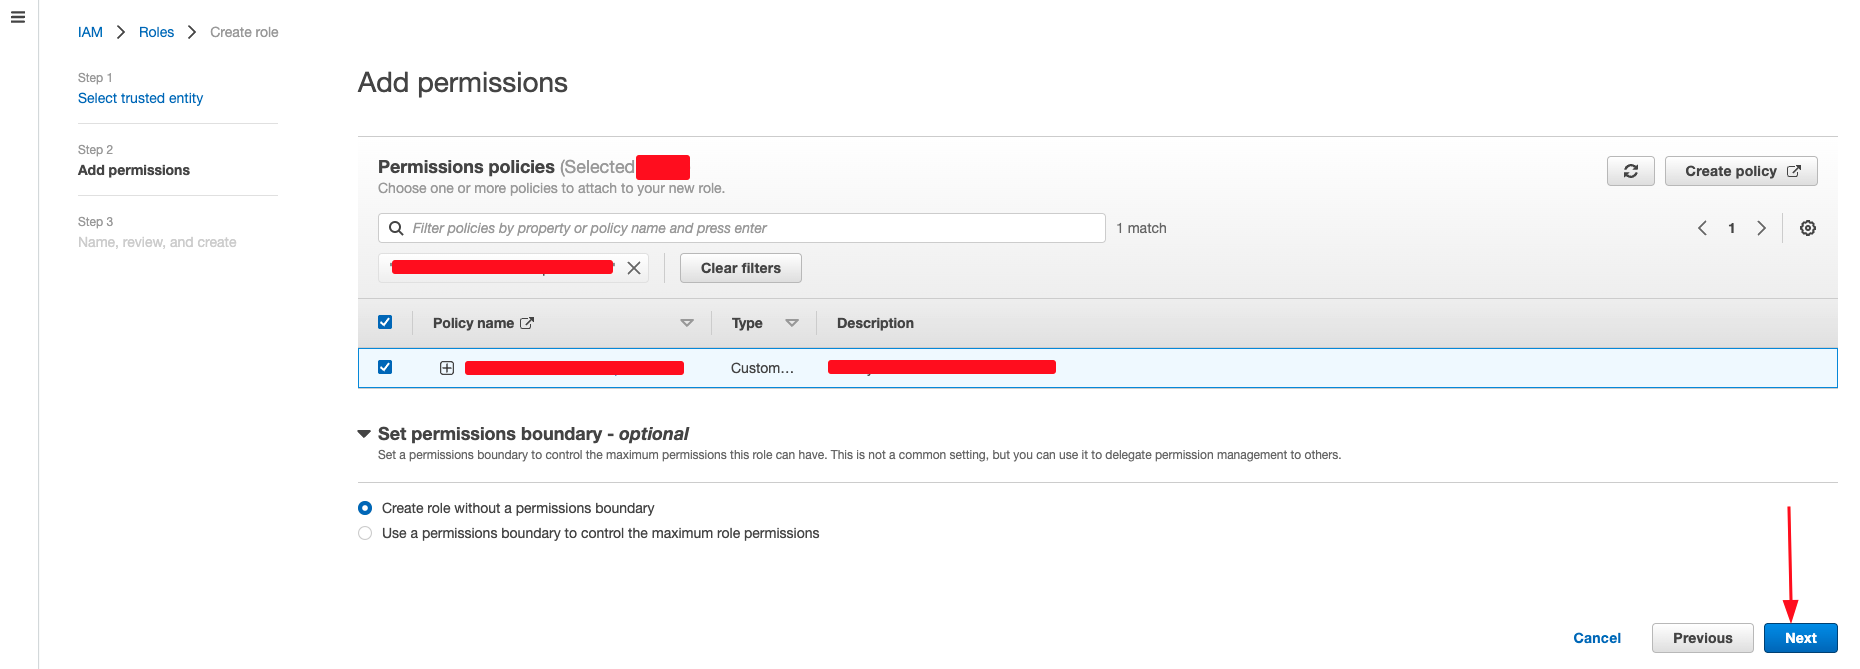
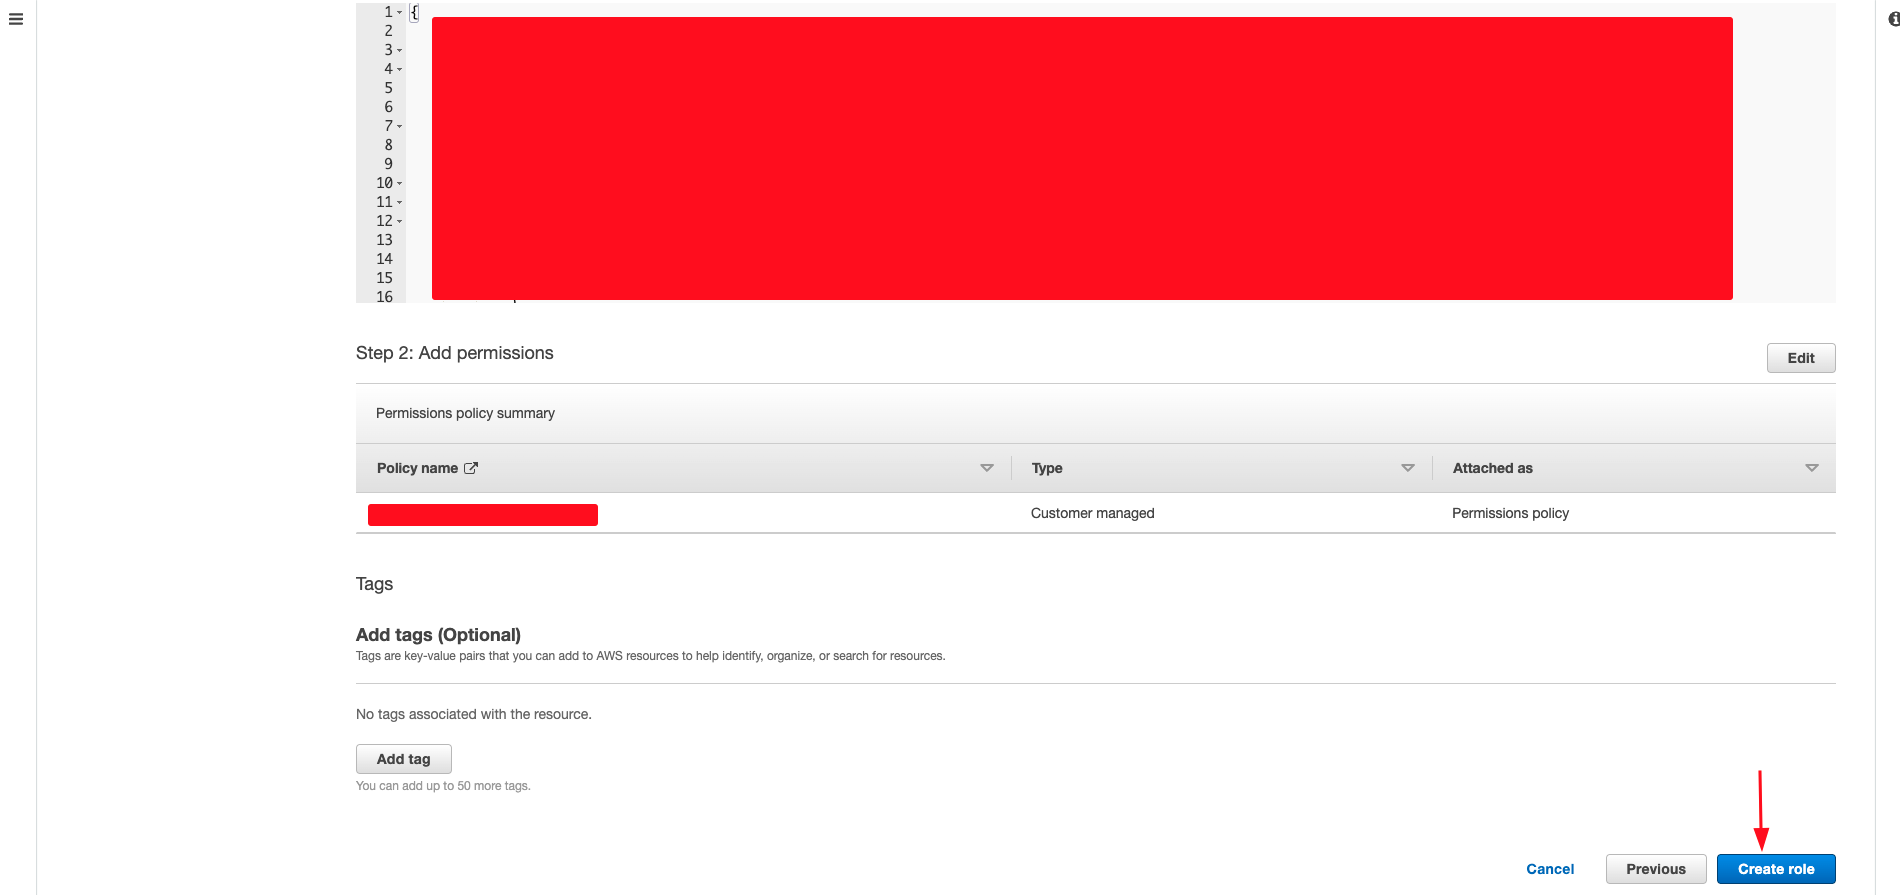
- We have to set the name, review and create the role.
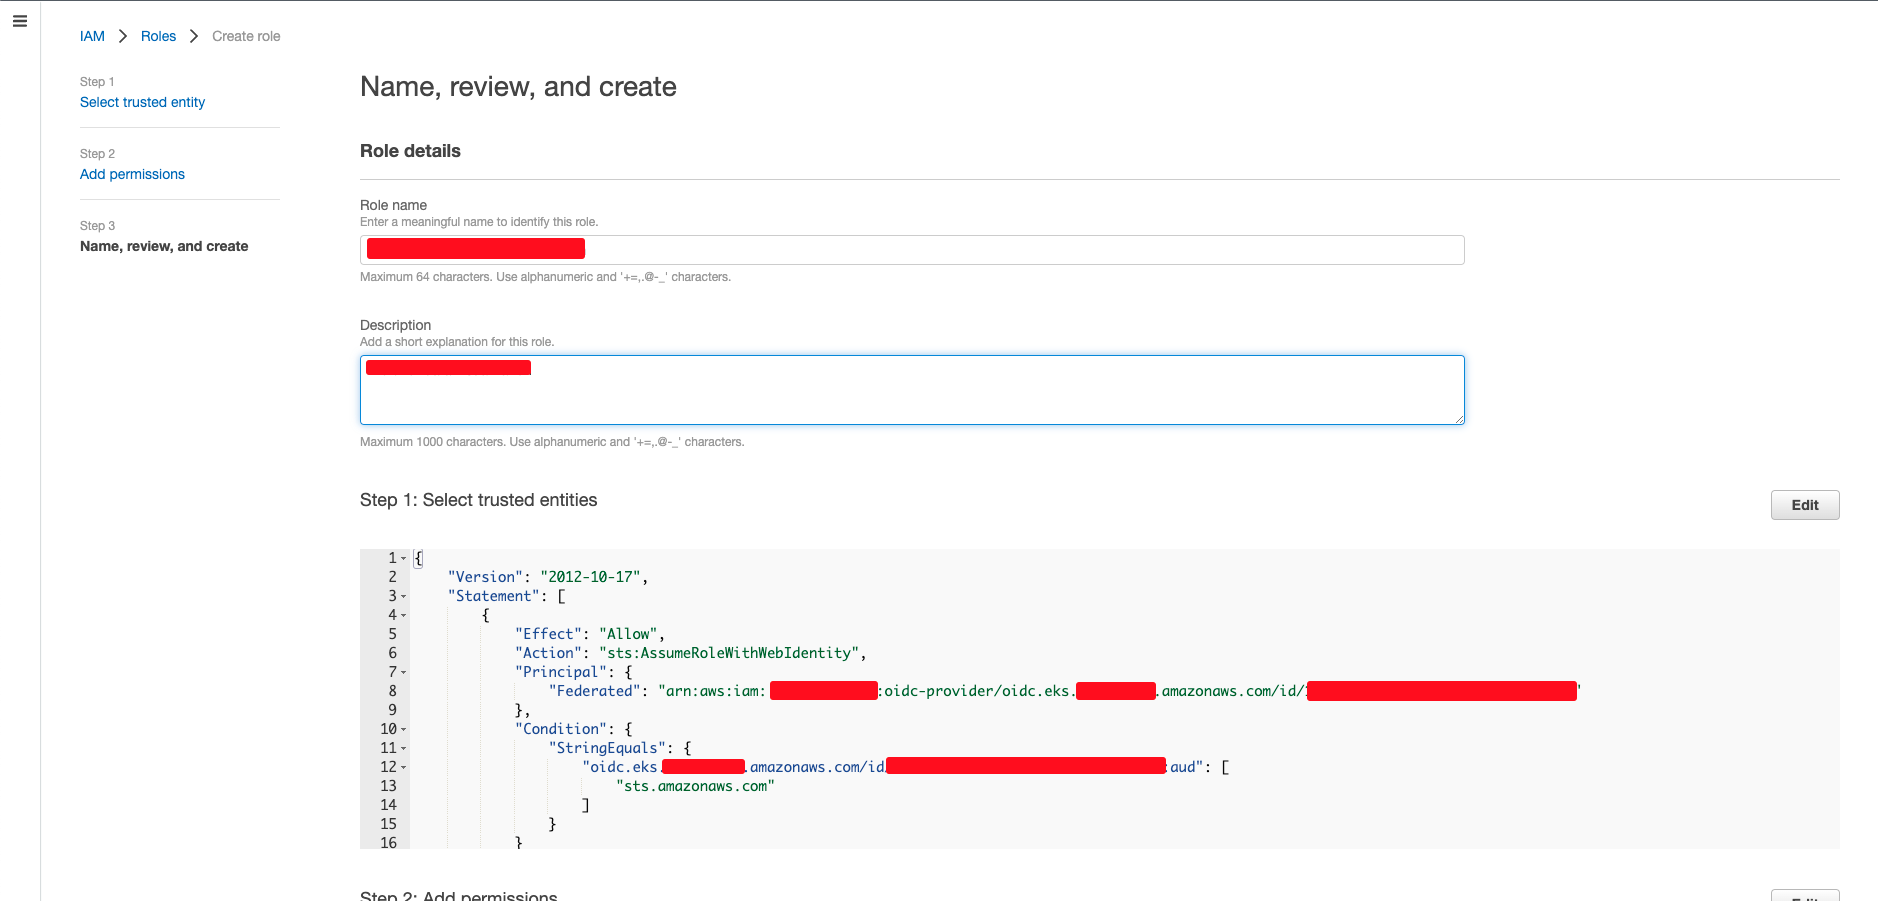
Now we have to make a small change so that the serviceaccount is associated with this role.
- View the trust relationship of the recently created role from IAM » Roles » Select the newly Created Role » Trust Relationships.
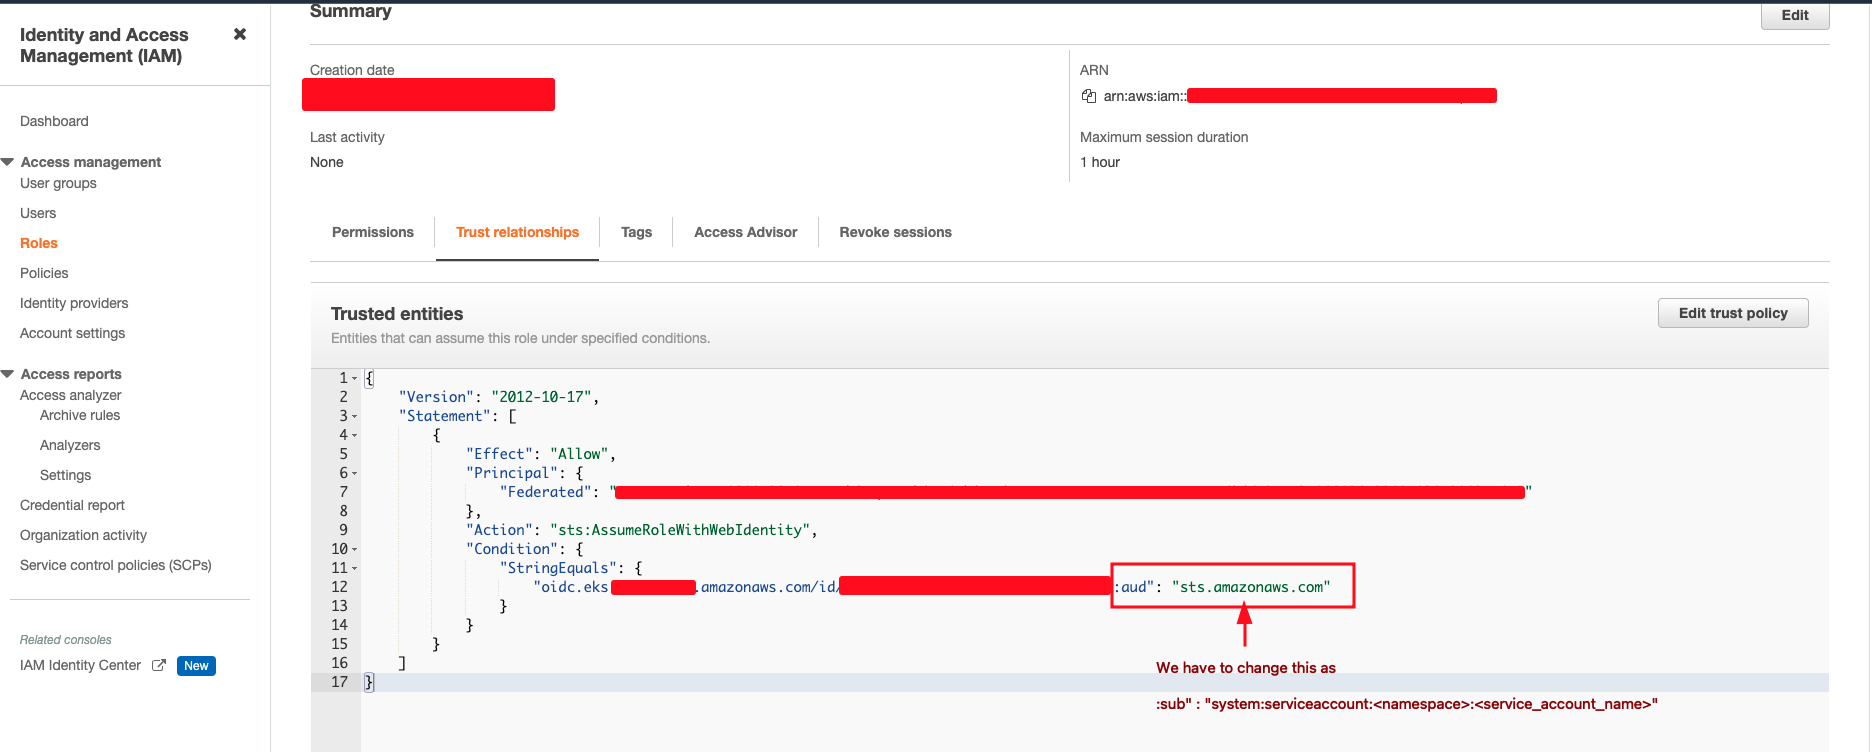
- We have to change the aud to sub and the “sts.amazonaws.com” to “system:serviceaccount:<namespace>:<service-account-name>”. For our use case it would be “system:serviceaccount:production:test”
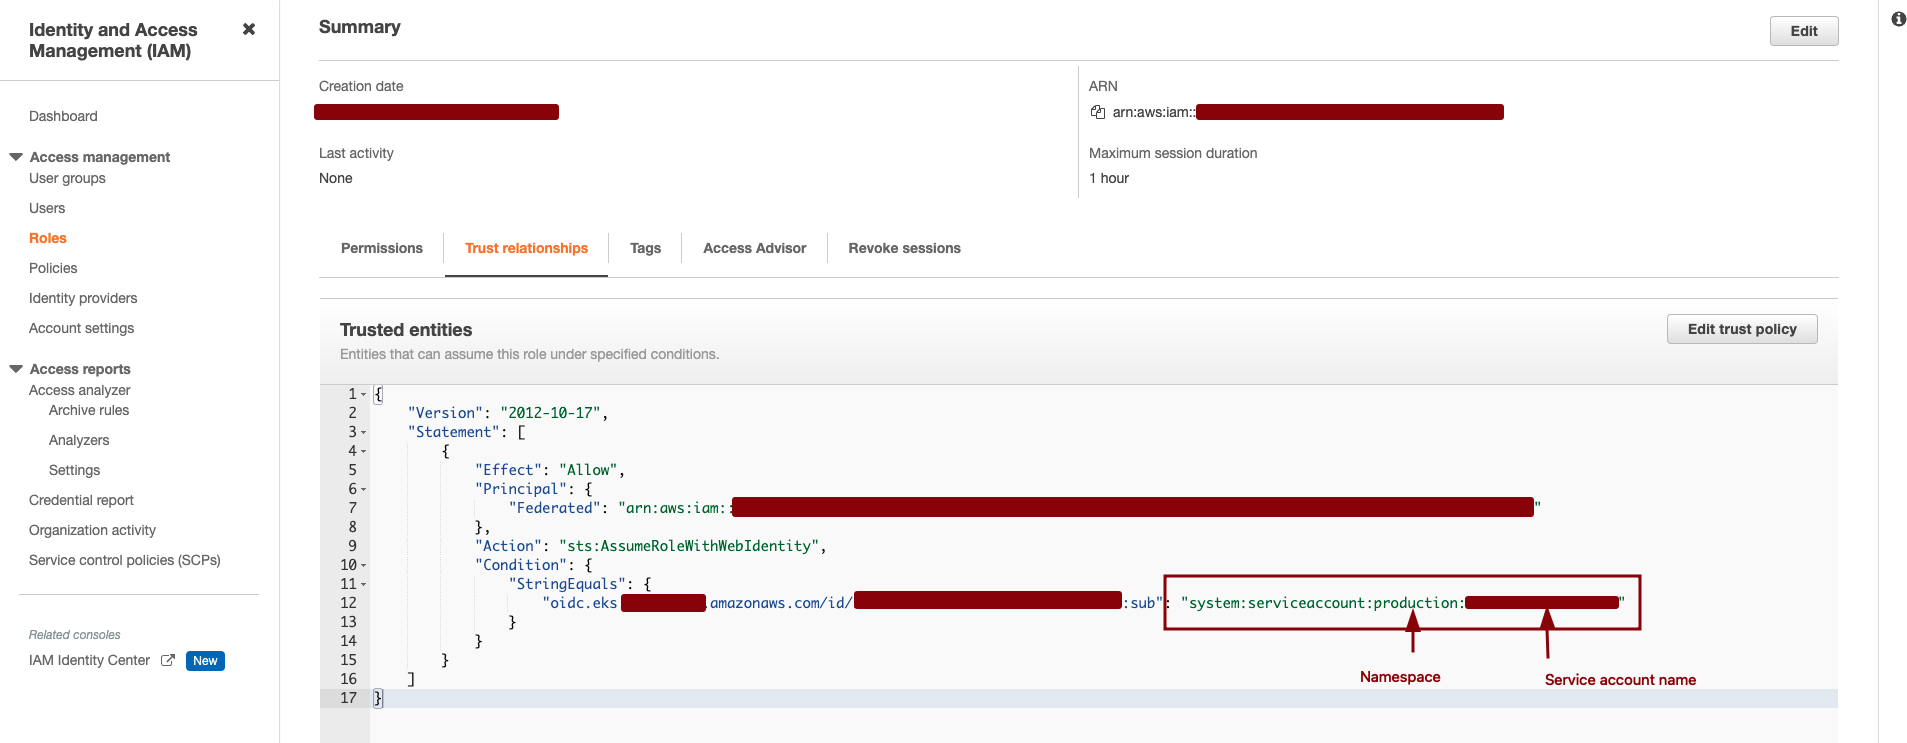
Now all the job is done on the AWS side. We just have to note the ARN of the role that can be seen on the screenshot above.
Adding annotations on the service accounts
- Let us edit the serviceaccount that we used on the deployment.
╭─ubuntu@kubernetes ~ ╰─$ kubectl edit sa test - Adding role’s arn as the annotation on the service account. The annotations that we have to add are:
- eks.amazonaws.com/role-arn : ARN-of-the-role
- eks.amazonaws.com/sts-regional-endpoints: “true” - Seting true to use regional STS endpoints helps in reducing the latency
apiVersion: v1
kind: ServiceAccount
metadata:
  annotations:
    eks.amazonaws.com/role-arn: arn:aws:iam::123456789:role/oidc-role
    eks.amazonaws.com/sts-regional-endpoints: "true"
  name: test
  namespace: production
secrets:
- name: test-token-zhbzn
- Now let us delete the secrets that we have created earlier and change the deployment.
╭─ubuntu@kubernetes ~
╰─$ kubectl get secrets
NAME                  TYPE                                  DATA   AGE
aws-secrets           Opaque                                2      36m
default-token-9p6nz   kubernetes.io/service-account-token   3      4d2h
test-token-zhbzn      kubernetes.io/service-account-token   3      36m

╭─ubuntu@kubernetes ~
╰─$ kubectl delete secret aws-secrets
secret "aws-secrets" deleted
- Changing the deployment such that the AWS credentials are not loaded inside pod as environment variables.
apiVersion: apps/v1
kind: Deployment
metadata:
  name: test
  labels:
    app: test
spec:
  selector:
    matchLabels:
      app: test
  template:
    metadata:
      labels:
        app: test
    spec:
      serviceAccountName: test
      containers:
      - image: shishirsub10/test
        name: test
- Let us rollout restart the deployment to ensure the changes that we have made gets reflected.
╭─ubuntu@kubernetes ~
╰─$ kubectl rollout restart deployment test
deployment.apps/test restarted
If everything goes as expected, you can see two new environment variables on the deployment : AWS_ROLE_ARN and AWS_WEB_IDENTITY_TOKEN_FILE and our application should work as expected without any problem.
Token Reflected on environment variables
╭─ubuntu@kubernetes ~
╰─$ k exec test-5b6467794-9j4gr -- env | grep "AWS_ROLE\|AWS_WEB"
AWS_ROLE_ARN=arn:aws:iam::*********:role/oidc-role
AWS_WEB_IDENTITY_TOKEN_FILE=/var/run/secrets/eks.amazonaws.com/serviceaccount/token
How often these tokens are rotated?
The
kubeletrequests and stores the token on behalf of the pod. By default, thekubeletrefreshes the token if it is older than 80 percent of its total TTL, or if the token is older than 24 hours.