Kubernetes Security - Network Policies
Kubernetes has revolutionized the way applications are deployed, managed and scaled, but with the rise of containers and microservices, securing these deployments becomes more crucial than ever. In this article, we will dive into the topic of Kubernetes security and focus on two key areas: network policy and scanning Docker images. Network policies are kubernetes objects to secure network traffic within a Kubernetes cluster, while scanning Docker images with Trivy can help identify vulnerabilities in the images that run in your containers. By taking a closer look at these two security features, we hope to provide a better understanding of how to secure your Kubernetes deployments and ensure the safety of your critical applications.
This article is the second part of the Kubernetes security series. The flask application that was created on the previous article will be used on this article as well. So please make sure to check this article first if you have not done it already.
Here are the topics that we will be covering on this blog post.
- Network Policy
- Introduction to SSRF
- Impact of SSRF on web application
- Demo of SSRF vulnerablities on web application hosted on kubernetes clusters
- Installation of Network CNI plugin(Calico) on EKS Clusters
- Using network policies to limit the attack surface on AWS EKS Clusters
- Scanning Docker images periodically
- Using trivy to scan docker images
- Integration of trivy on CI/CD pipelines
Network Policy
Using network policy, we can control how pod or group of pods can communicate with each other and with other network endpoints.
@app.route('/fetch', methods=["GET","POST"])
def fetch():
    url = request.args.get("url")
    try:
        r = requests.get(url)
        return r.text
    except:
      return 'Please enter a valid url'
In our flask application that we have used on previous article, there was an endpoint /fetch which takes url as a GET parameter, visits the website provided and displays the content back to us. While this might be a very useful and legitimate feature, an attacker might abuse this functionality as there are no any limitation on what the value of that url parameter can be. An attacker can provide url such as 127.0.0.1 and our application will try to fetch the content that is hosted on that IP. Although this will not be any impactful on this particular case as nothing is running on localhost on port 80, but that always might not be the case.
Server Side Request Forgery
This attack is known as Server Side Request Forgery(SSRF). With this vulnerability, we can trick the server where the application is hosted to make requests to any arbitary destination that an attacker wants.
An attacker can use SSRF attacks to perform some of the following actions.
-
Access sensitive information: Attacker is able to make requests to the machines on the internal network without the need of the VPN. Since the connection is initiated by a web application running inside the private network, it is possible for such application to reach out to other application and server which were not reachable publicly from the internet. For eg. cloud providers like AWS and GCP host an internal metadata server on
169.254.169.254which provide a lot of information about the instance on which our pod is running along with security credentials. If the attacker got hold of these credentials, they can use the credentials to perform malicious acitivites on the cloud provider. -
Bypass firewalls and access control: If the application is hosted internally and is not reachable from the internet, there is high chance for the ease of access, proper security measure like access control, patching might not have been implemented. Since the requests are made by an internal application, the attacker can to their advantage to bypass firewalls as well as access the internal applications which would have needed credentials if accessed from internet.
-
Privilege Escalation: SSRF can be used to combine with other different vulnerabilities to escalate privileges and gain more foothold on the system.
To learn more about SSRF with hands on practice, please check out this article by Portswigger.
Exploiting SSRF vulnerablity
Now that we know what SSRF is and how it can be exploited, let us revisit our flask application. Since there are no sanitization on url parameter, /fetch endpoint is vulnerable to SSRF.
To show the impact of this vulnerability, I will be running a local python web server on 127.0.0.1:5000 imitating a web server hosting sensitive information and use /fetch endpoint from our flask application to read the content hosted by this web application.
Note: 127.0.0.1 is a special IP address which is also known as loopback address which is used to refer to host’s own network interface. Communication over this IP addess does not go over a physical network and the traffic is routed to the same machine. That means it is impossible for me to request the python webserver directly that is running on port 5000 on local interface inside a pod from my local machine by browsing 127.0.0.1:5000.
Creating a deployment
If you already have a pod running from the previous article, you can completely ignore this step.
---
apiVersion: v1
data:
  USERNAME: shishirsub10
  PASSWORD: I_SURELY_HAVE_A_VERY_SECURE_PASSWORD
kind: ConfigMap
metadata:
  name: my-credentials
---
apiVersion: apps/v1
kind: Deployment
metadata:
  name: test
  labels:
    app: test
spec:
  selector:
    matchLabels:
      app: test
  template:
    metadata:
      labels:
        app: test
    spec:
      containers:
      - env:
        envFrom:
        - configMapRef:
            name: my-credentials
        image: shishirsub10/k8s-security-demo
        name: test
Applying the deployment
╭─ubuntu@shishir ~/Desktop/demo/k8s
╰─$ kubectl apply -f deploy.yaml
configmap/my-credentials created
deployment.apps/test created
Both configmap and deployment are successfully created.
Checking if the pod is on running or not?
╭─ubuntu@shishir ~/
╰─$ k get pods
NAME                   READY   STATUS    RESTARTS   AGE
test-9d8db8f75-whzwf   1/1     Running   0          29s
The pod has been created successfully.
Running a python server manually on port 5000
To replicate a web server that is running on local interface(127.0.0.1), let us create a python HTTP server which runs on port 5000 on local interface.
╭─ubuntu@shishir ~/
╰─$ k exec -ti test-9d8db8f75-whzwf -- /bin/bash
www-data@test-9d8db8f75-whzwf:/app$ python3 -m http.server --bind 127.0.0.1 5000
Serving HTTP on 127.0.0.1 port 5000 (http://127.0.0.1:5000/) ...
- Usually the main application will be reachable from the internet. So in order to reach the flask web server from my local machine, I am forwarding my local machine port 8000 to the port 8000 inside the pod.
$ k port-forward test-9d8db8f75-whzwf 8000:8000. Using this now that flask server is reachable onhttp://localhost:8000from our local machine. Please note that I am only exposing the flask application running on port 8000 but not the python HTTP server. - We have an endpoint
/fetchwhich takesurlas input, visits the URL and returns the content of the website as a response. Since there are no any validation for GET parameterurl, what if we providehttp://localhost:5000as the value for theurlparameter?
Using curl to make a request to the flask application
Let us make a request to /fetch?url=http://localhost:5000 using curl from our local machine. Let us verify if we are able to get the content of the python HTTP web server running on local interface.
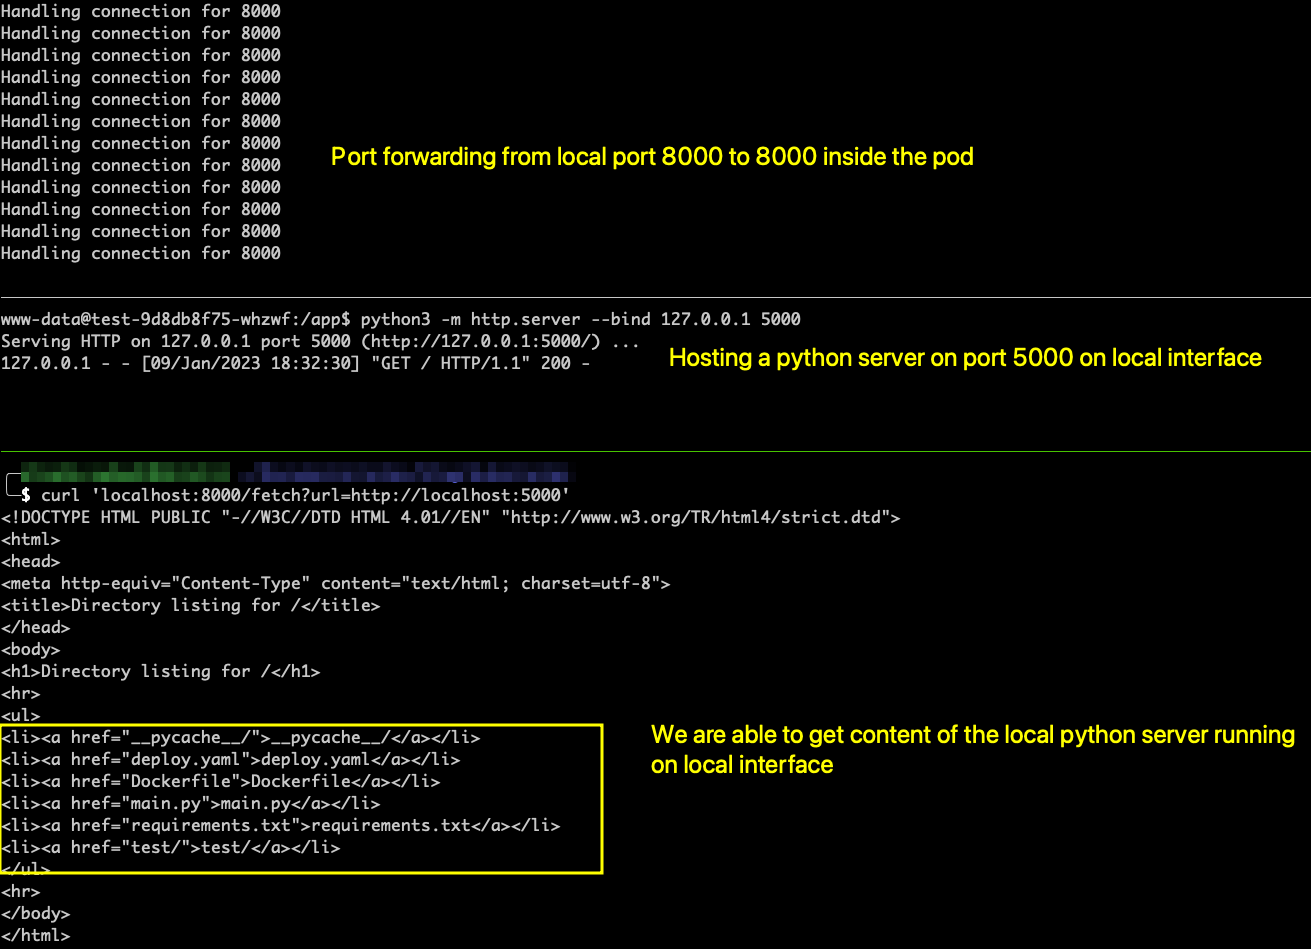
After making the request, We can clearly see that we are getting back the content of the internal python HTTP server. Python server is just a representative of a web application that is running behind VPN or on local interface which is not accessible from the internet. Since the application is not accessible from the internet, there might be a very high chance that proper security measures like access control, applying security patches are not implemented on this internal web application.
Impact of Server Side Request Forgery(SSRF) on AWS clusters
This kinds of attacks are more impactful if the application is running on managed kubernetes clusters like EKS, GKE etc. For EKS clusters, deployments run on EC2 instances as docker containers and the cloud providers have a metadata server hosted on 169.254.169.254 which an EC2 instance can reach and can provide a lot of information including sensitive credentials. Let us use this SSRF vulnerability to extract the credentials from the AWS metadata server.
Making a request to AWS metadata server
╭─ubuntu@shishir ~/
╰─$ curl 'localhost:8000/fetch?url=http://169.254.169.254/latest/'
dynamic
meta-data
user-data
We successfully get the response. To make this more impactful, let us make a request to get the content of http://169.254.169.254/latest/meta-data/identity-credentials/ec2/security-credentials/ec2-instance endpoint as it contains security credentials. The security credentials obtained will have the effective permission of an EC2 instance on which the pod is running.

On our local machine, let us verify if the obtained credentials are valid or not.
$ export AWS_ACCESS_KEY_ID=****************
$ export AWS_SECRET_ACCESS_KEY=******************
$ export AWS_DEFAULT_REGION=test-mars-1
$ export AWS_SESSION_TOKEN==******************=******************=******************=******************=******************

$ aws sts get-caller-identity
{
    "UserId": "0123456789012:aws:ec2-instance:i-12abcdef123456789",
    "Account": "0123456789012",
    "Arn": "arn:aws:sts::0123456789012:assumed-role/aws:ec2-instance/i-12abcdef123456789"
}
And the credentials are valid. If the IAM policies are overly permissive in AWS, this can lead to very dangerous things including compromise of all EC2 instances as well as EKS clusters.
Using Network Policies
We can use network policy to deny all of the requests that are made to the metadata server from the application running inside the pod. Network policies are implemented using network plugins like Calico or Cilium. AWS EKS use the Amazon CNI plugin as the default network plugin which do not have any support network policy objects.
So before we create a network policy for our flask application, we need to install a network plugin on the EKS cluster for this to work as expected. Even if you are able to apply the network policy object on your EKS cluster without the installation of the network plugin, it would not work as expected even if the network policy is created successfully.
Note: GKE clusters support network policie objects by default.
Installation of calico using helm on AWS EKS clusters
$ helm repo add projectcalico https://docs.projectcalico.org/charts
"projectcalico" has been added to your repositories

$ helm repo update

$ kubectl create namespace calico-system

$ helm install calico projectcalico/tigera-operator --namespace calico-system --version v3.24.5
- Here we add the calico helm repo to our local list of repositories.
- We update the helm repos so that the latest changes are reflected.
- We create a seperate namespace
calico-systemfor the installation - We install Calico using helm charts on
calico-systemnamespace.
After completing the installation, now we can create a network policy which can be used to block the access to AWS metadata server(169.254.169.254).
networkpolicy.yaml
apiVersion: networking.k8s.io/v1
kind: NetworkPolicy
metadata:
  name: block-ssrf-on-aws
spec:
  egress:
  - to:
    - ipBlock:
        cidr: 0.0.0.0/0
        except:
        - 169.254.0.0/16
  podSelector: {}
  policyTypes:
  - Egress
- We are allowing all the outgoing traffic(
egress) to internet(0.0.0.0) except CIDR range of169.254.0.0/16for all the pods in the namespace where this network policy is applied to. - Note that this is only valid for the namespace where it is applied to. If you create a new namespace, you need to apply this network policy to that namespace as well.
- We can have a fine grain control over incoming and outgoing connection from a pod’s perspective. Also, we can make use of label and selector on the network policy to pinpoint the pod to which we want apply the policy.
Follow this official documentation to learn more about network policies.
Let us apply the networkpolicy and verify if that fixes our issue.
╭─ubuntu@shishir ~/
╰─$ kubectl apply -f networkpolicy.yaml
networkpolicy.networking.k8s.io/block-ssrf-on-aws created
Let us again make that curl request from our local machine.
╭─ubuntu@shishir ~/
╰─$ curl 'localhost:8000/fetch?url=http://169.254.169.254/latest/meta-data/identity-credentials/ec2/security-credentials/ec2-instance'
Please enter a valid url
- This time the connection hangs for some time and we hit the except block that was present on the code. We are now unable to make a request to AWS metadata server from the application running inside the pod.
- But note that we can still make requests to services running on localhost(
127.0.0.1) even after this network policy is applied. We can not make use of NetworkPolicy to block the access to the services that are only running on local interface. For that, you have to properly sanitize theurlparameter before making a request on that particular address.
Scanning docker images periodically
It is always a good idea to scan the docker images for vulnerabilities that are used on the kubernetes deployment to ensure that the image does not contains any known vulnerabilities that an attacker can exploit to get an access on the system. After scanning the images for vulnerabilities, we should work on fixing the issues if there are any.
For scanning docker images, we will be using a tool called trivy made by aquasecurity.
Scanning docker image using trivy
You can follow this installation guide on how to install trivy on your machine.
For the demo, I will be using docker image provided by aqua security to scan one of the image that we have been using for this article with tag shishirsub10/k8s-security-demo:latest.
╭─ubuntu@shishir ~/
╰─$ docker run --rm aquasec/trivy image shishirsub10/k8s-security-demo:latest

2023-01-09T23:26:30.407+0545	INFO	Need to update DB
2023-01-09T23:26:30.407+0545	INFO	DB Repository: ghcr.io/aquasecurity/trivy-db
2023-01-09T23:26:30.407+0545	INFO	Downloading DB...
35.99 MiB / 35.99 MiB [-------------------------------------------------------------------------------------------------------------------------------------------] 100.00% 8.56 MiB p/s 4.4s
2023-01-09T23:26:44.459+0545	INFO	Detected OS: alpine
2023-01-09T23:26:44.459+0545	WARN	This OS version is not on the EOL list: alpine 3.17
2023-01-09T23:26:44.459+0545	INFO	Detecting Alpine vulnerabilities...
2023-01-09T23:26:44.461+0545	INFO	Number of language-specific files: 1
2023-01-09T23:26:44.461+0545	INFO	Detecting python-pkg vulnerabilities...
2023-01-09T23:26:44.463+0545	WARN	This OS version is no longer supported by the distribution: alpine 3.17.0
2023-01-09T23:26:44.463+0545	WARN	The vulnerability detection may be insufficient because security updates are not provided

shishirsub10/k8s-security-demo:latest (alpine 3.17.0)
=====================================================
Total: 0 (UNKNOWN: 0, LOW: 0, MEDIUM: 0, HIGH: 0, CRITICAL: 0)

2023-01-09T23:26:44.464+0545	INFO	Table result includes only package filenames. Use '--format json' option to get the full path to the package file.

Python (python-pkg)
===================
Total: 1 (UNKNOWN: 0, LOW: 0, MEDIUM: 0, HIGH: 1, CRITICAL: 0)

+-----------------------+------------------+----------+-------------------+---------------+---------------------------------------+
|        LIBRARY        | VULNERABILITY ID | SEVERITY | INSTALLED VERSION | FIXED VERSION |                 TITLE                 |
+-----------------------+------------------+----------+-------------------+---------------+---------------------------------------+
| setuptools (METADATA) | CVE-2022-40897   | HIGH     | 57.5.0            | 65.5.1        | pypa-setuptools: Regular              |
|                       |                  |          |                   |               | Expression Denial of Service          |
|                       |                  |          |                   |               | (ReDoS) in package_index.py           |
|                       |                  |          |                   |               | -->avd.aquasec.com/nvd/cve-2022-40897 |
+-----------------------+------------------+----------+-------------------+---------------+---------------------------------------+
Trivy has identified just one vulnerability and also suggested the version that we can upgrade to which will fix the issue.
The results might be very different in your case while scanning the docker images with trivy. For eg. in your case trivy might show hunderds of security vulnerabilities. If that is the case, you should patch those issues as soon as possible. It would be a very good idea to integrate trivy on CI/CD pipelines where trivy scans the images right after they are built. Additionaly, we can write our CI/CD pipelines in such a way that the build fails whenever trivy manages to find critical vulnerabilities.
Check out trivy documentation to find out more on how you can integrate trivy on CI/CD pipelines according to your needs.
Reference for docker security: https://shishirsubedi.com.np/docker/docker_security/.